FAQ
- General Information
- Buying on-line
- Digital Products
- Microscopy Basics
The Motic Europe Limited Lifetime Warranty assures that the microscope is guaranteed against defects in material and workmanship for the life of the product. Normal wear, routine maintenance, light bulbs, batteries, fuses, damage resulting from repair by unauthorized parties, accident, alteration, shipping, misuse or abuse is not covered. Warranty service is provided by Motic Europe’s authorized technicians. The warranty period starts on the date of invoice. Determination of warranty is at the technician’s discretion.
Motic Europe has various categories of warranty:
- Electrical components are covered for 2 years
- For optical and mechanical components, depending on the product:
- 2-year Limited Warranty: Digital cameras (including built-in cameras within digital microscopes) and built-in tablets; as well as the MoticEasyScan Series.
- 5- year Limited Warranty: BA50-80 Series, EcoLine Series, BA Series (incl. MET), BA Elite Series, AE Series, POL Series, Panthera Series, SMZ Series, K Series, GM Series, PSM Series.
- 10- year Limited Warranty: Classic Line, Educational Line, RED Line, SWIFT Line.
- Lifetime Optical Warranty: SFC100 Series and ST30 Series.
The products bought on Outlet area are guaranteed against any manufacturing fault during a period of 2 years.
There is a wide network of distributors throughout Europe. In case you need a personal recommendation, please contact us through our website and we will forward your request to a sales partner close to your place.

A microscope is a powerful scientific instrument. Science education in teaching institutes and universities is deeply depending on this instrument. Organizationally and financially justified, the students/users share the common instruments of a classroom.
Besides the well-known procedures to maintain the performance, in Corona times additional care is needed to avoid spreading the virus. Time to update our care recommendations.
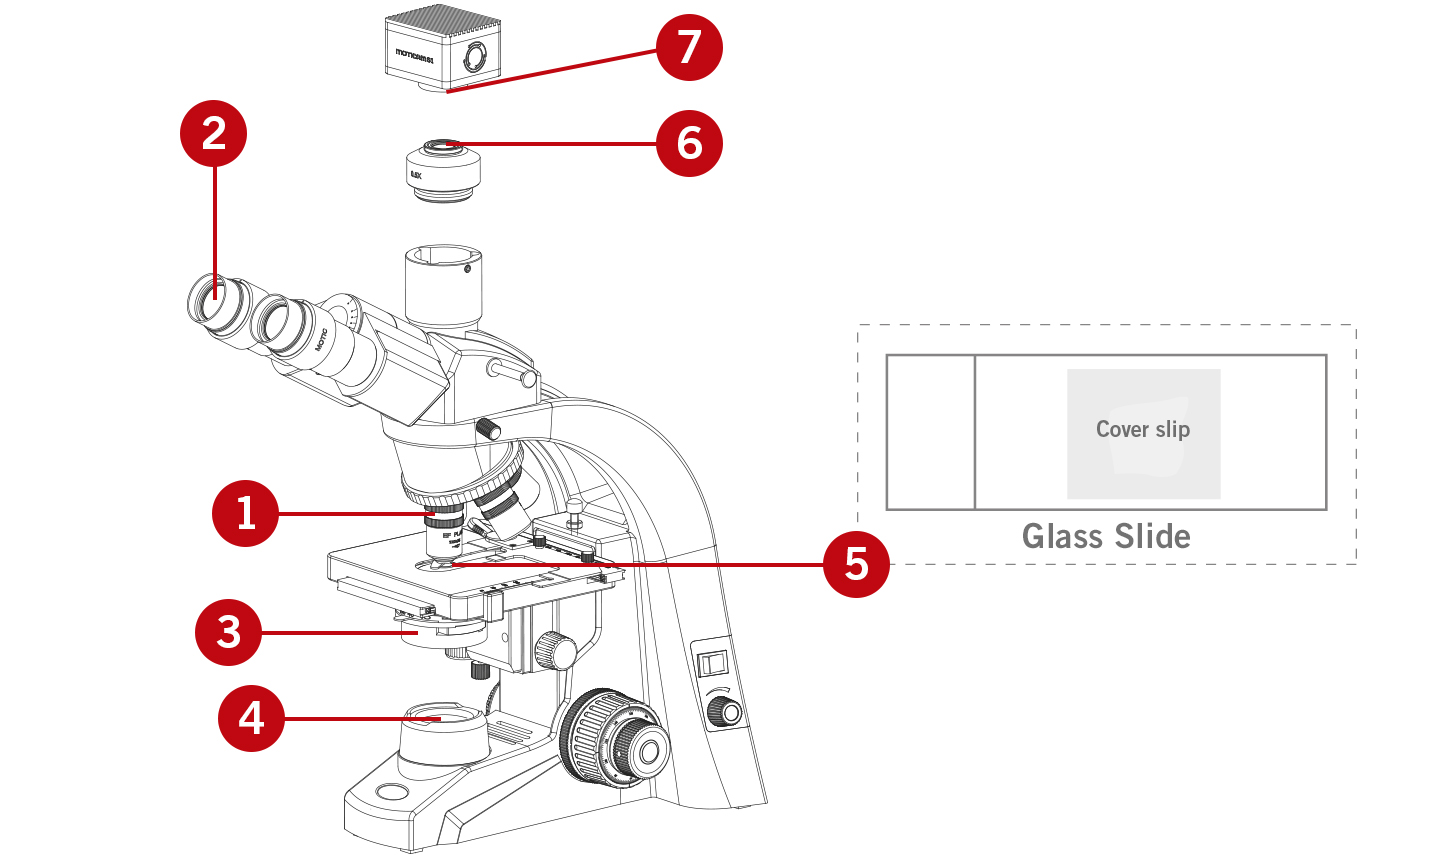
IMPORTANT MICROSCOPE CONTACT AREAS
(1) Objectives
(2) Eyepieces
(3) Condenser
(4) Collector cover glass
(5) Glass slide including the cover slip
In the case the microscope is combined with a camera attached, you may find dirt
(6) On the lenses of the camera adapter (C-mount)
(7) On the protection glass (IR filter) of the camera sensor
Attention: All inner surfaces of the optical elements are strictly taboo! Do not disassemble any part of your microscope for cleaning purposes. You only have access to the outer surfaces of these components. Disassembly will significantly affect the performance of your instrument and will void the terms of warranty. If you notice a malfunction in mechanics or electrics, please contact your nearest Motic supplier.
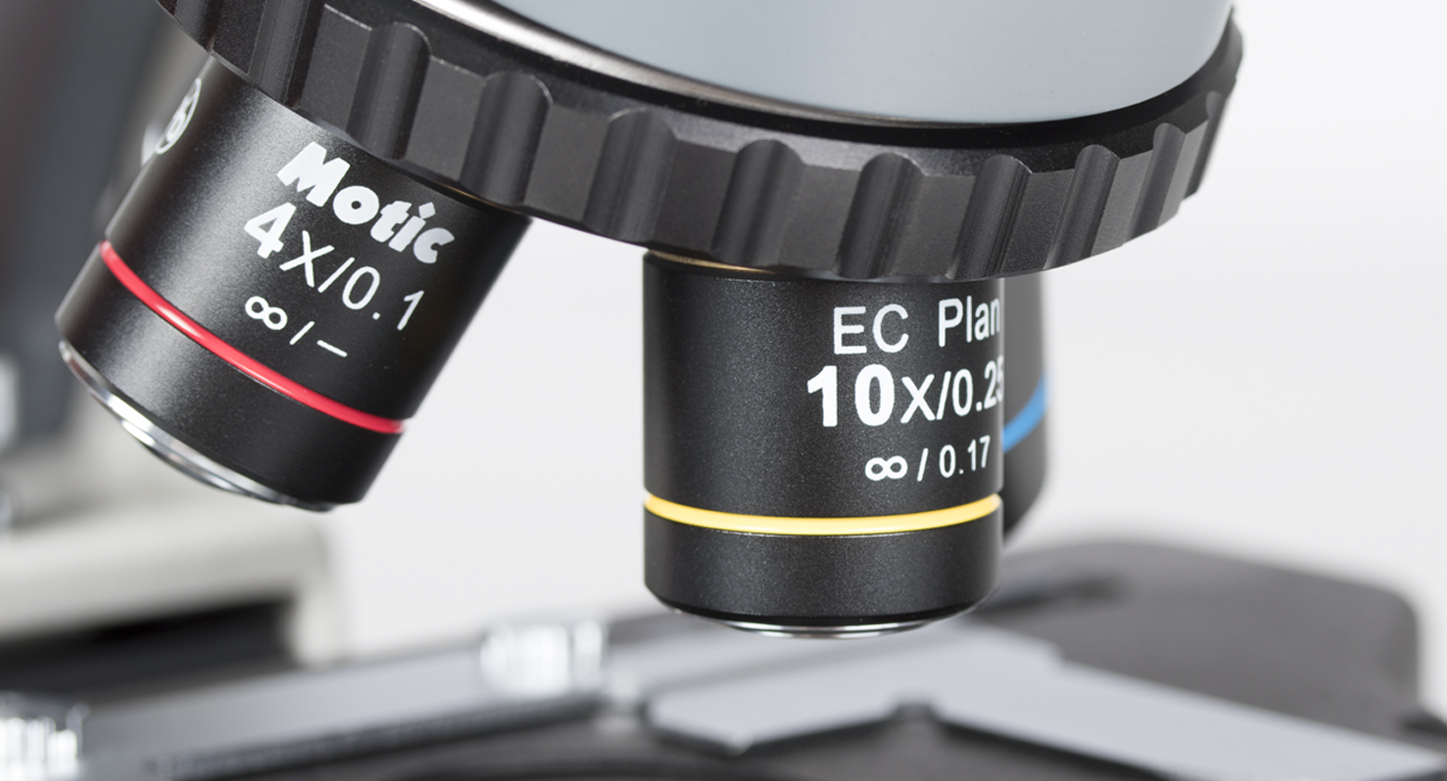
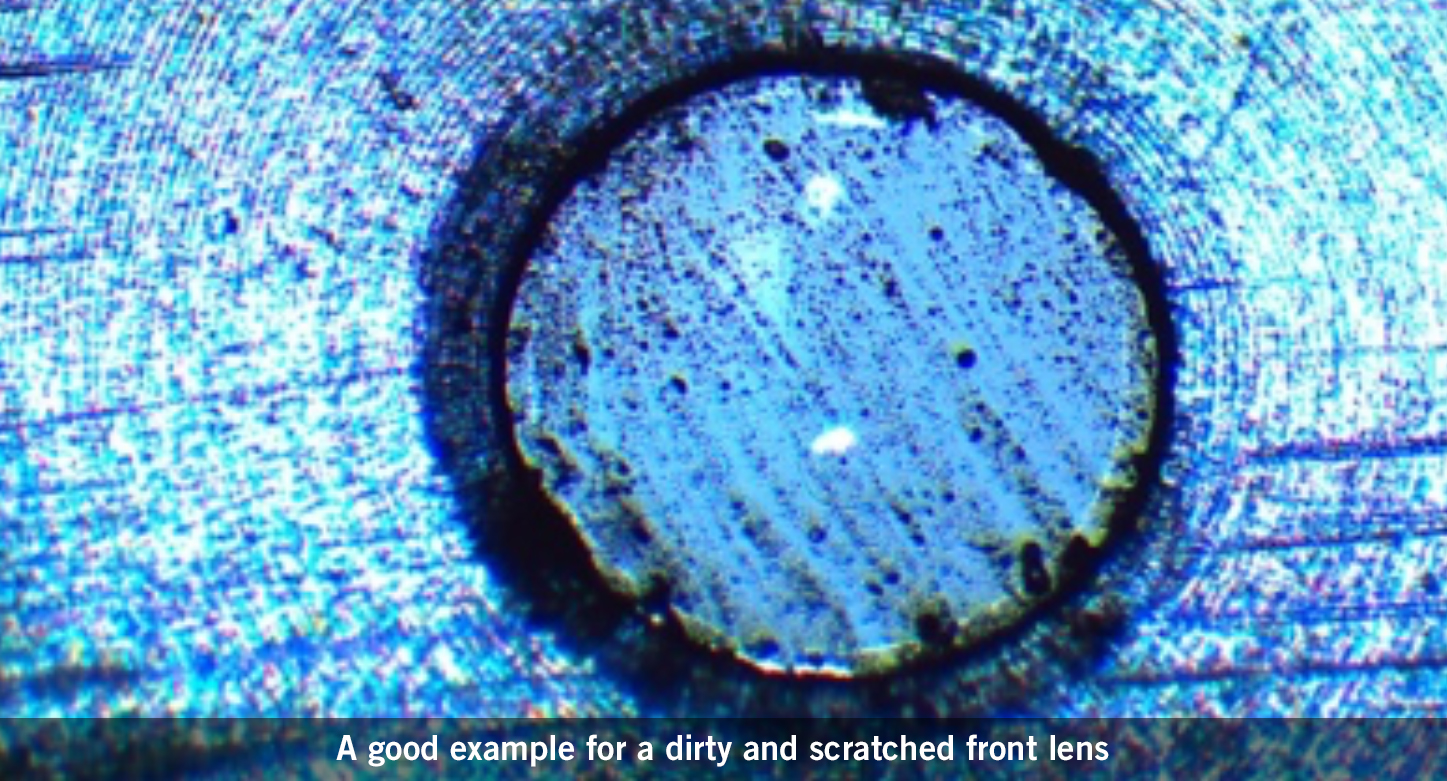
(1) OBJECTIVES
Objectives are the most important optical component of your microscope that require the greatest care for cleanliness. In actual use, the front lens takes the highest risk for pollution, as it comes closest to the sample.
Since on the lenses you always find dust or other species, we recommend to use first an air blower.
HOW TO CLEAN OBJECTIVES THAT WORK WITHOUT IMMERSION OIL (“DRY OBJECTIVES”)
Basic level
Keep the objective within the nosepiece. A small piece of pure cotton (an old T-shirt without imprint will do fine) is moistened with ethyl alcohol (70%). The cloth should be moist, but not wet! Softly (!) push the cotton swab onto the front lens and rotate it without any pressure. Check the swab; if you can see any dirt, repeat this procedure with a new swab. Do not use a dry cloth from the kitchen, it may contain hard linen fibres not suitable for cleaning and protecting the coating of the front lens.
Professional level
Carefully unscrew the objective from the nosepiece and place it onto a table to avoid a dropping. The above described cleaning procedure should be applied. To check the effect of cleaning, pull out an eyepiece from the eyepiece tube, use it upside down (180° rotated) like a magnifying glass. Hold the eyepiece close to your eye like a jeweller in the old crime movies.
HOW TO CLEAN OBJECTIVES THAT WORK WITH IMMERSION OIL (“OIL OBJECTIVES”)
Both Basic & Professional level
These objectives (mostly 100X magnification) are mainly used by experienced students due to the delicate immersion process. The cleaning procedure is the same as with dry objectives. Just take one action before: First press a cotton swab onto the front lens. This will soak up the main portion of the affixing immersion oil. It is essential to clean this kind of objective after each work session.
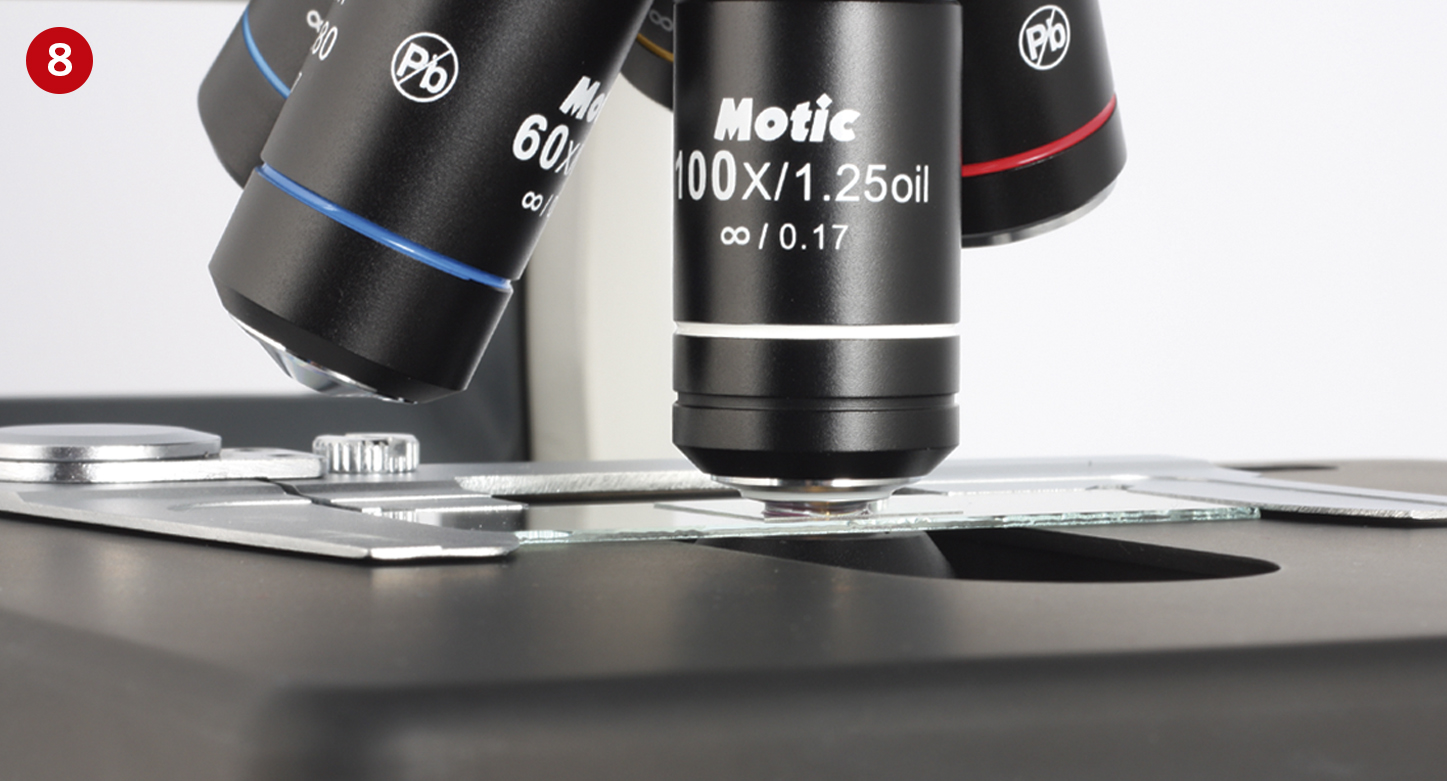
Objectives with a small working distance (40X, 60X) are mounted close to the 100X lens and thus take the greatest risk for contamination with immersion oil from the slide surface. A preventive maintenance is recommended for these objectives.
(2) EYEPIECES
The cleaning method for eyepieces is the same as with objectives. One more time you only have access to the outer lens surface, in this case the upper eye lens. When in use, it’s the skin lipids from the eyebrows which causes pollution. Take off the eyecups (9) from the eyepiece(s) and then use the cotton swab with ethyl alcohol to clean the glass surface.
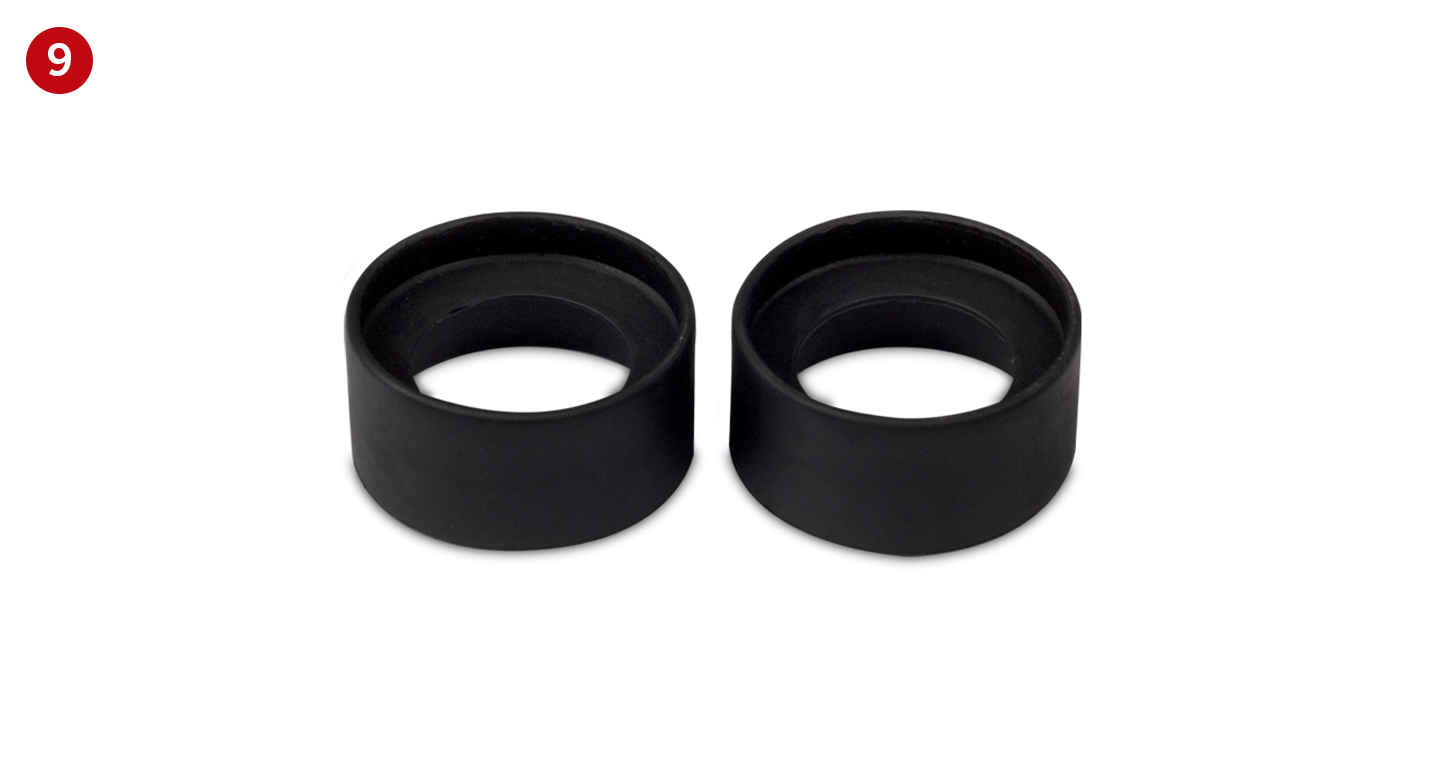
COVID-19 information The virus seems to be in favour of skin lipids to be transmitted to a second person. Rinse the eyecups separately with water and detergent. Please note that eyecups are manufactured from very different materials. Flexible and adaptable, stiff: no chance to recommend a more defined cleaning agent.
(3) CONDENSER
The condenser is a less critical component in terms of image quality. Take care that dust is removed with a brush, a piece of cotton or clean compressed air. In most cases a solving fluid (water, alcohol, etc.) is not necessary.
(4) COLLECTOR COVER GLASS
The light exit in the base of a transmitted light microscope is predestined for dust pollution. Simply removed it with brush, a piece of cotton or clean compressed air. In most cases a solving fluid (water, alcohol, etc.) is not necessary.
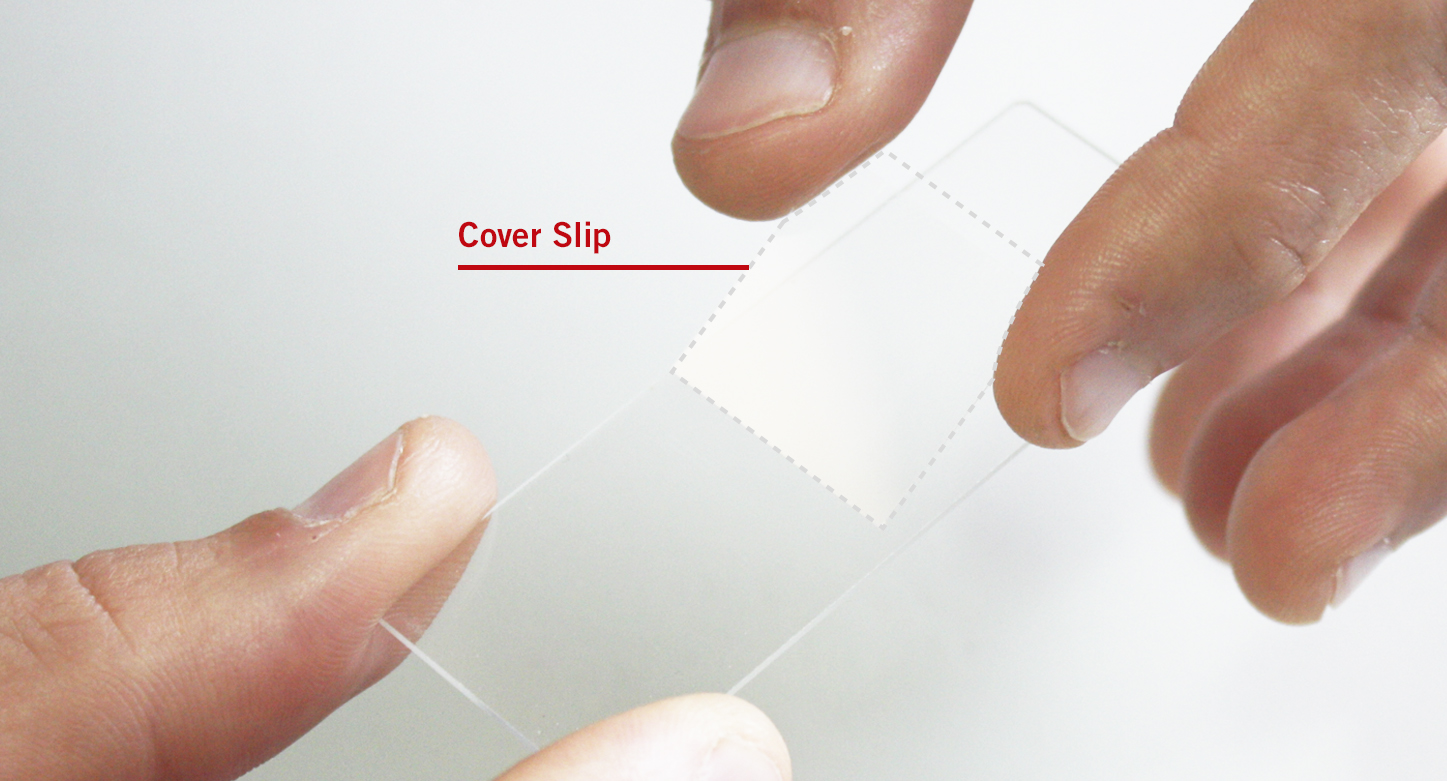
(5) GLASS SLIDE INCLUDING THE COVER SLIP
Polish the glass slide with a piece of cotton to remove fingerprints before using it. Place your sample into a drop of water, then add carefully the cover slip. Please take care that you do not touch the surface of the cover slip.
Professional level
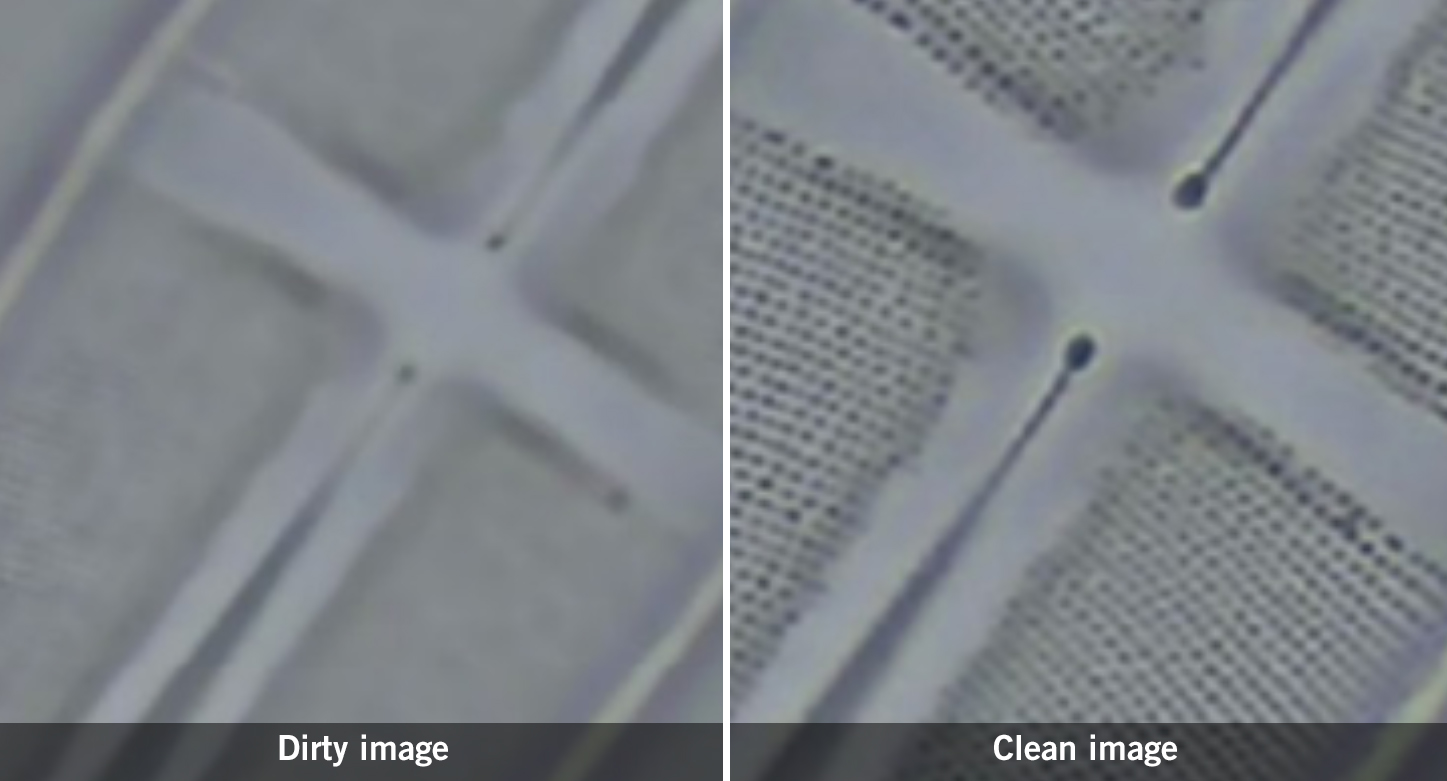
The detection of pollution within the optical path of a transmitted light microscope is essential for an effective cleaning. The so-called “conjugated levels” are related levels with the optical path. The following conjugated levels are most important for dirt detection:
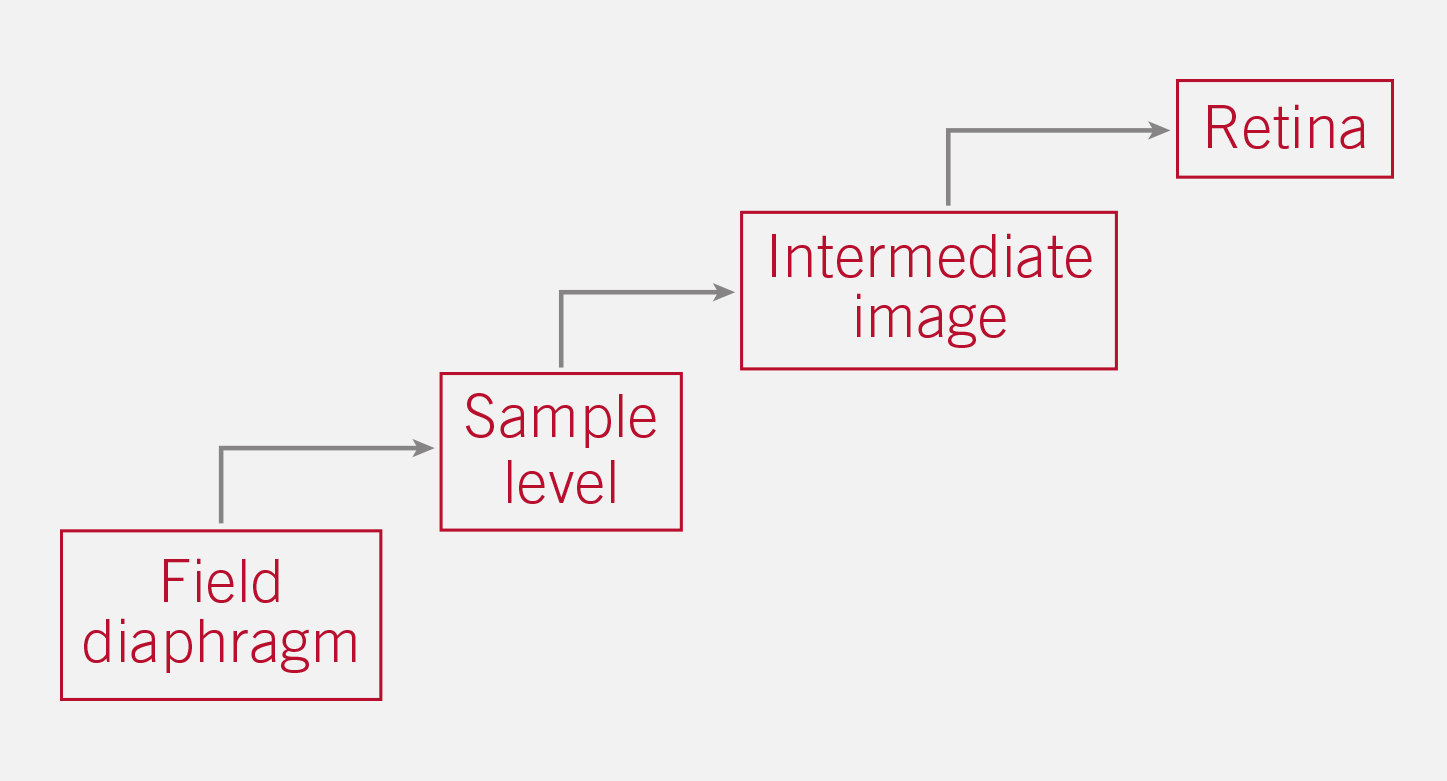
Example: Dust on the collector cover glass (near Field diaphragm) will be seen on all “following” levels. A fingerprint on the sample will be visualized in the intermediate image, the human eye and the sensor of a potential camera.
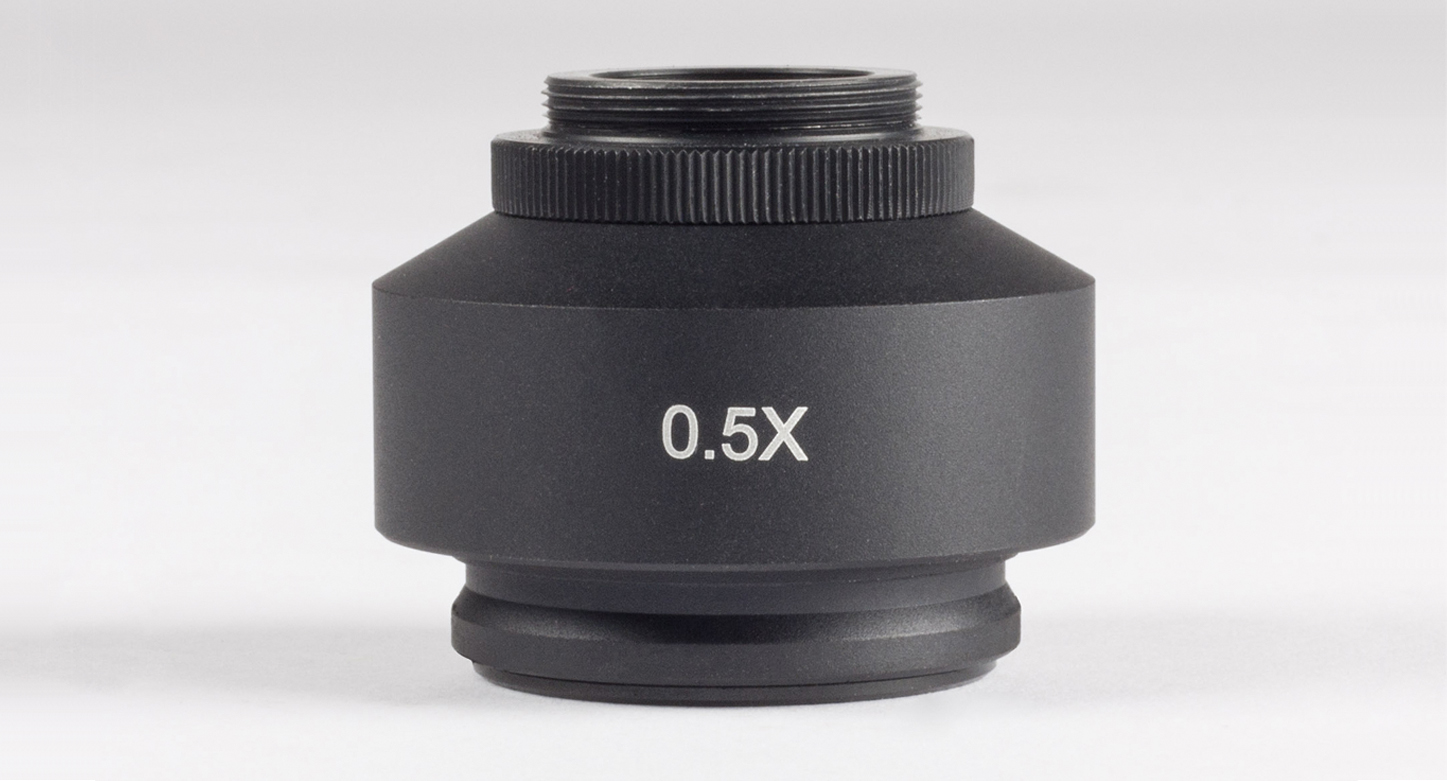
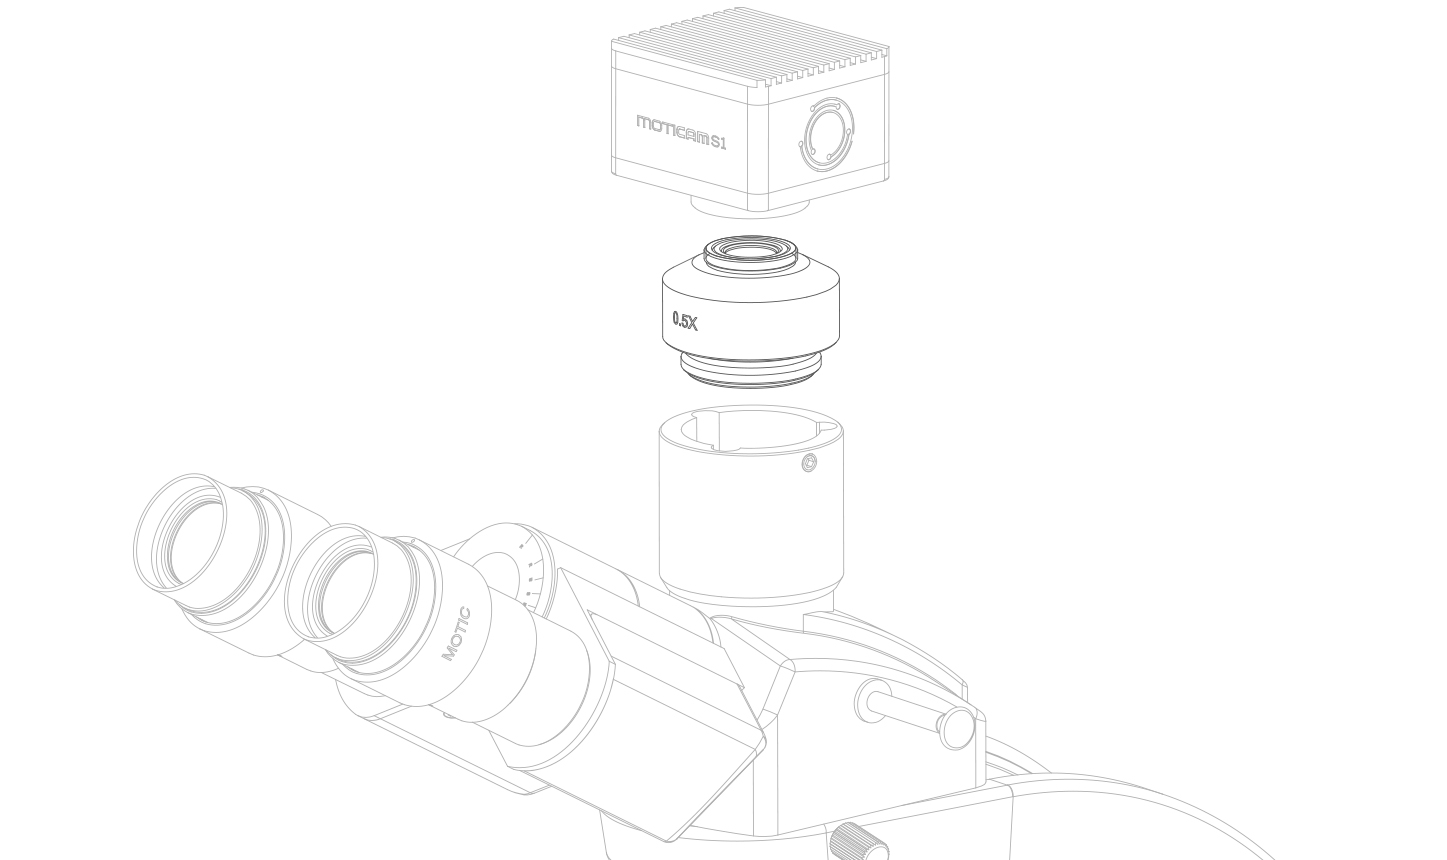
(6) C-MOUNT ADAPTER
The C-mount adapter is an optical/mechanical piece, ready to mount a respective camera on top of a Trinocular microscope. Pollution on the external surfaces of the lenses within are rarely visible in normal operation. Cleaning with ethyl alcohol (70%) and cotton swab will do fine. This should be done only by an experienced person.
(7) PROTECTION GLASS (IR FILTER) OF THE CAMERA SENSOR
Professional level
This is the most critical component if it comes with a camera. Rotate the camera with C-mount while loosen the fixing screw on top of the photo exit of the Trinocular tube. If the dust spots are rotating, the dust is located within the microscope. In case the dust spots keep their position on the screen, it’s the protection glass. The dust is in close “relation” to the pixel of the sensor below and stays in relative position. The cleaning procedure should be done stepwise. Start with a soft brush or clean compressed air. If these procedures are not sufficient, photo stores can supply more options. If possible, use a stereo microscope for control. Be careful with any liquid as the protection glass has no perfect sealing!
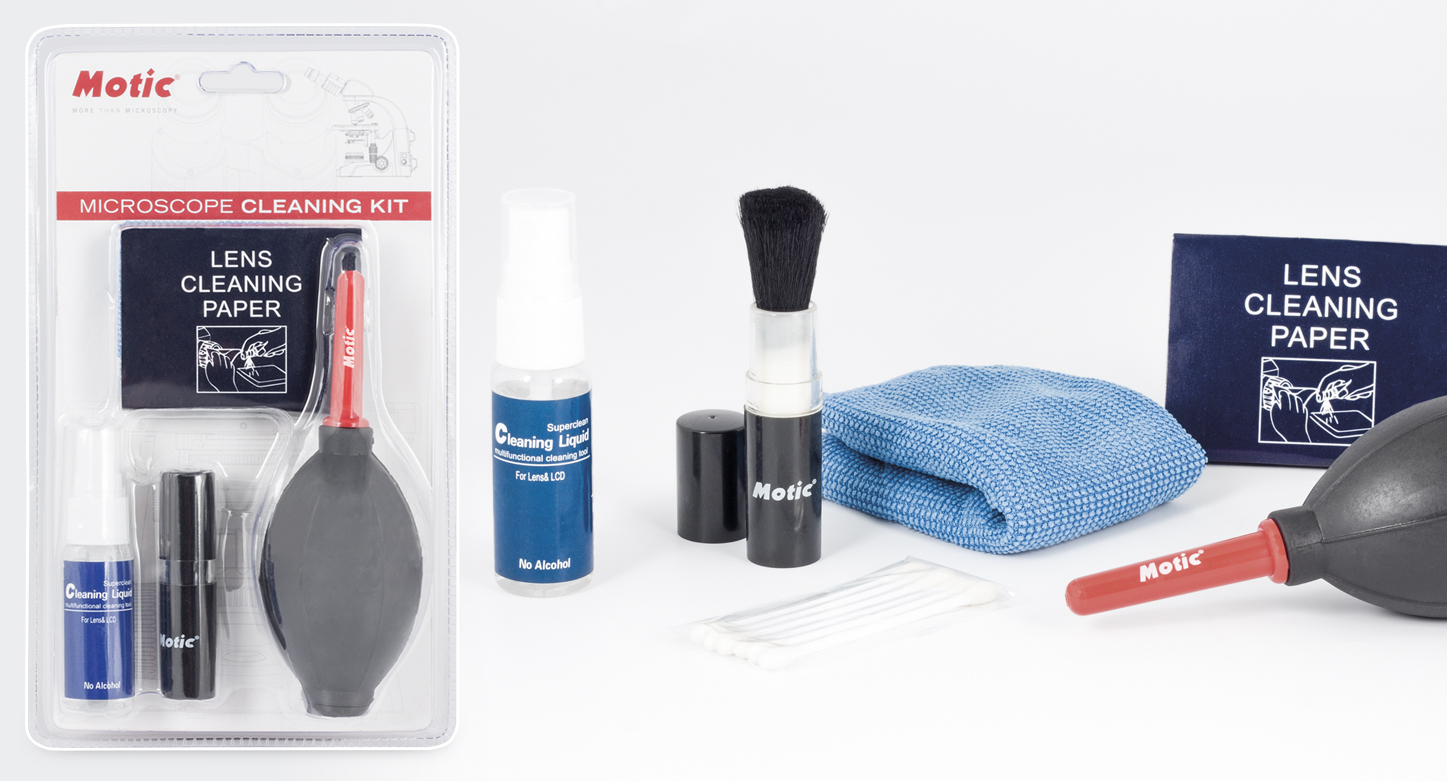
Microscope Cleaning kit available
Additional COVID-19 information: As already mentioned, the virus seems to be in favour of skin lipids to be transmitted. That is why you should take care of sterilizing the coarse/fine focus knobs before and after use.
The message is: Leave the instrument exactly like you want to meet it again.
In case of further questions, you may contact your Motic supplier or just contact us.
DOWNLOAD THE GUIDE AS PDF VERSION
ENGLISH | ESPAÑOL | DEUTSCH | FRANÇAIS | ITALIANO
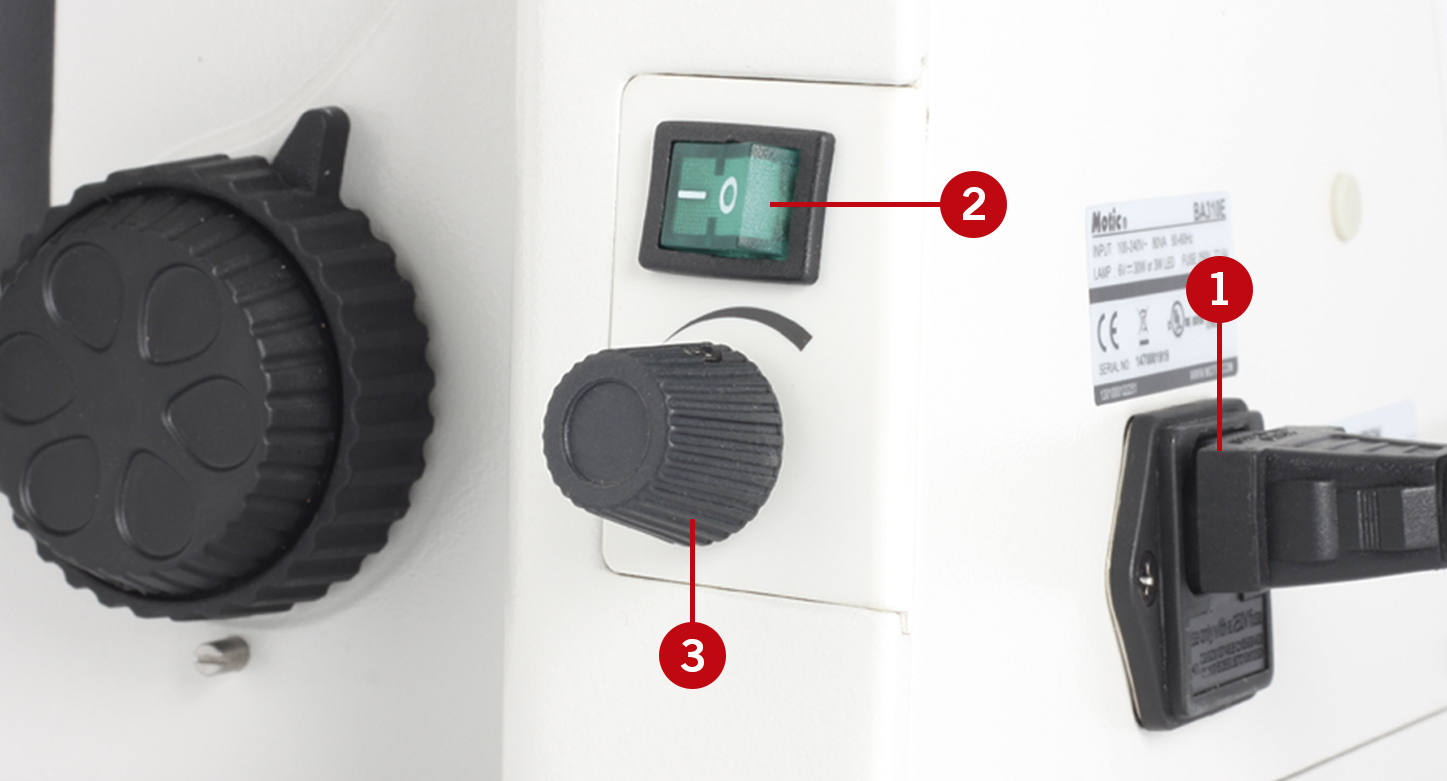
Switch on the Microscope
Before switching on the microscope, plug-in the microscope to the power supply (1). Once this is done, switch it on (2) and gradually increase the intensity control (3).
Interpupillary distance adjustment
Before adjusting the interpupillary distance, place the sample on the specimen holder, and select the 10X objective (4).
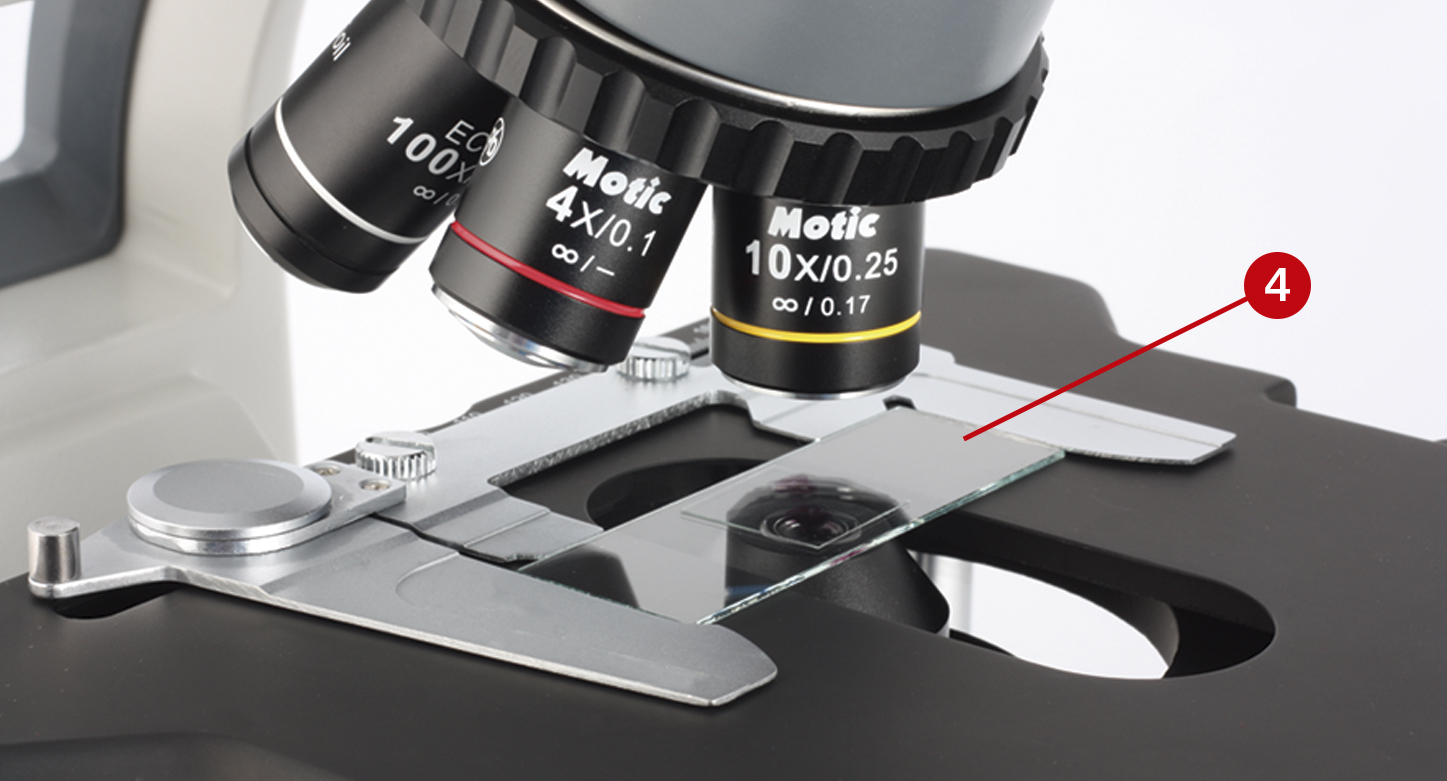
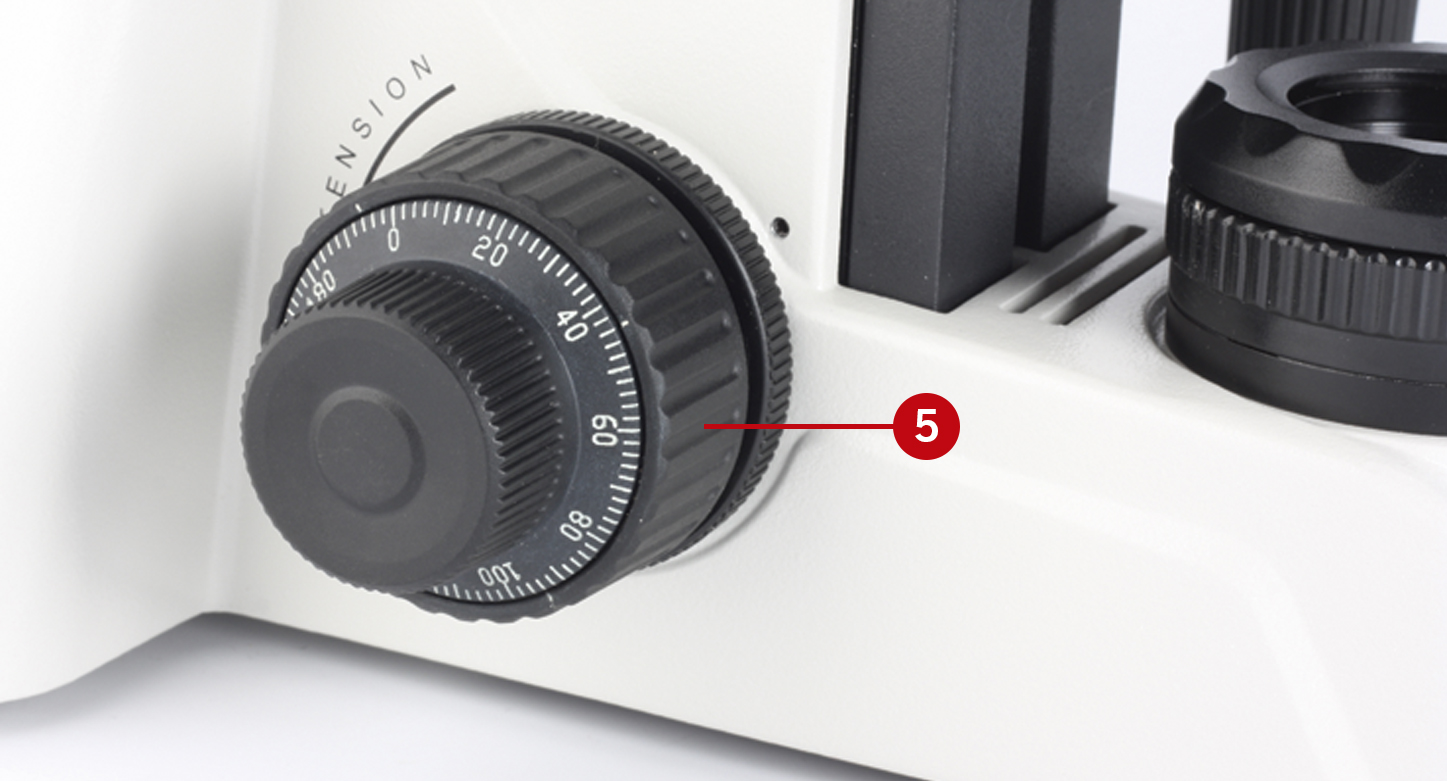
Focus the sample by using the coarse focusing knob, which is located on the left side of the microscope’s stand (5).
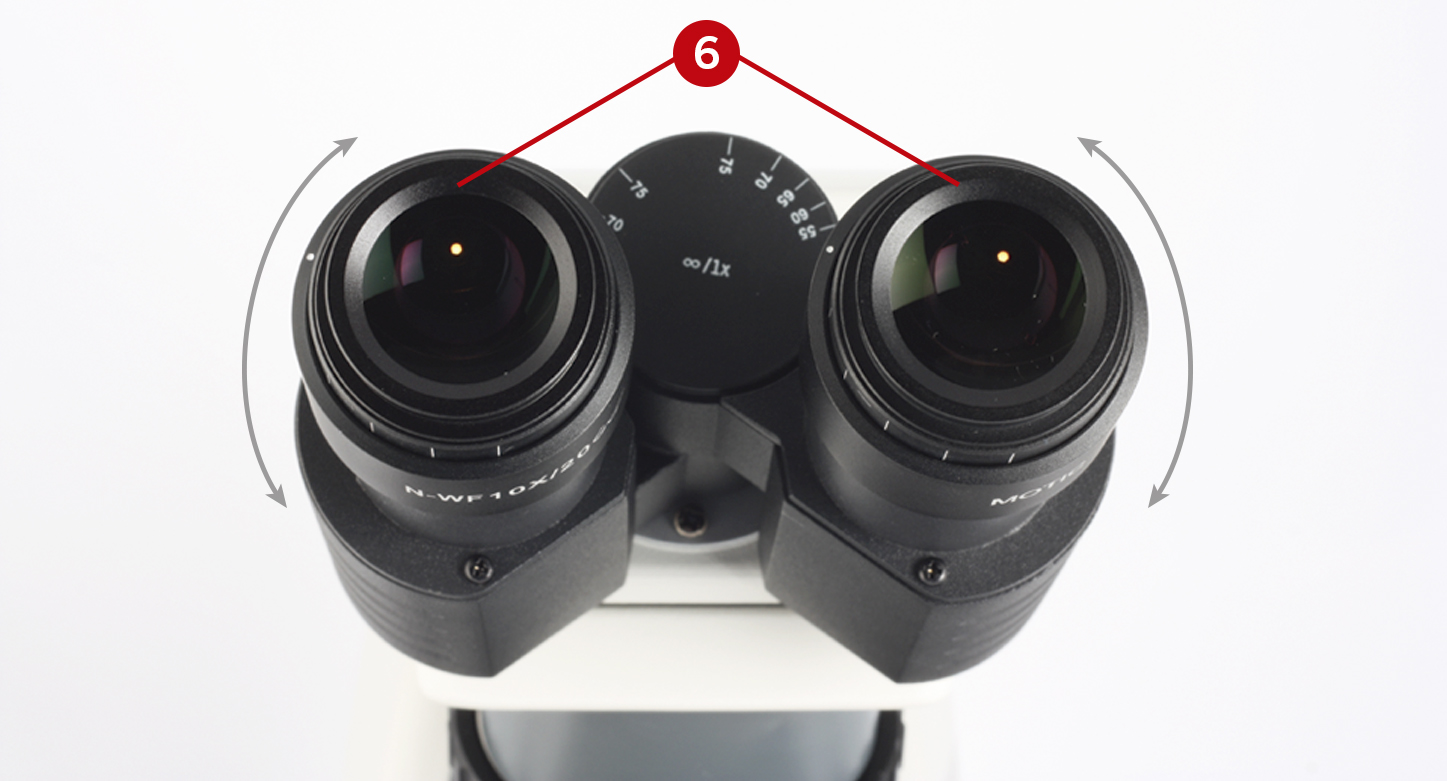
Then, adjust the interpupillary distance so that both the right and left field of view become one image. This adjustment will allow the user to observe the specimen with both eyes (6).
Diopter adjustment
The diopter adjustment compensates any differences in vision between the left and the right eye.
Look through the eyepiece on the right side with your right eye (7).
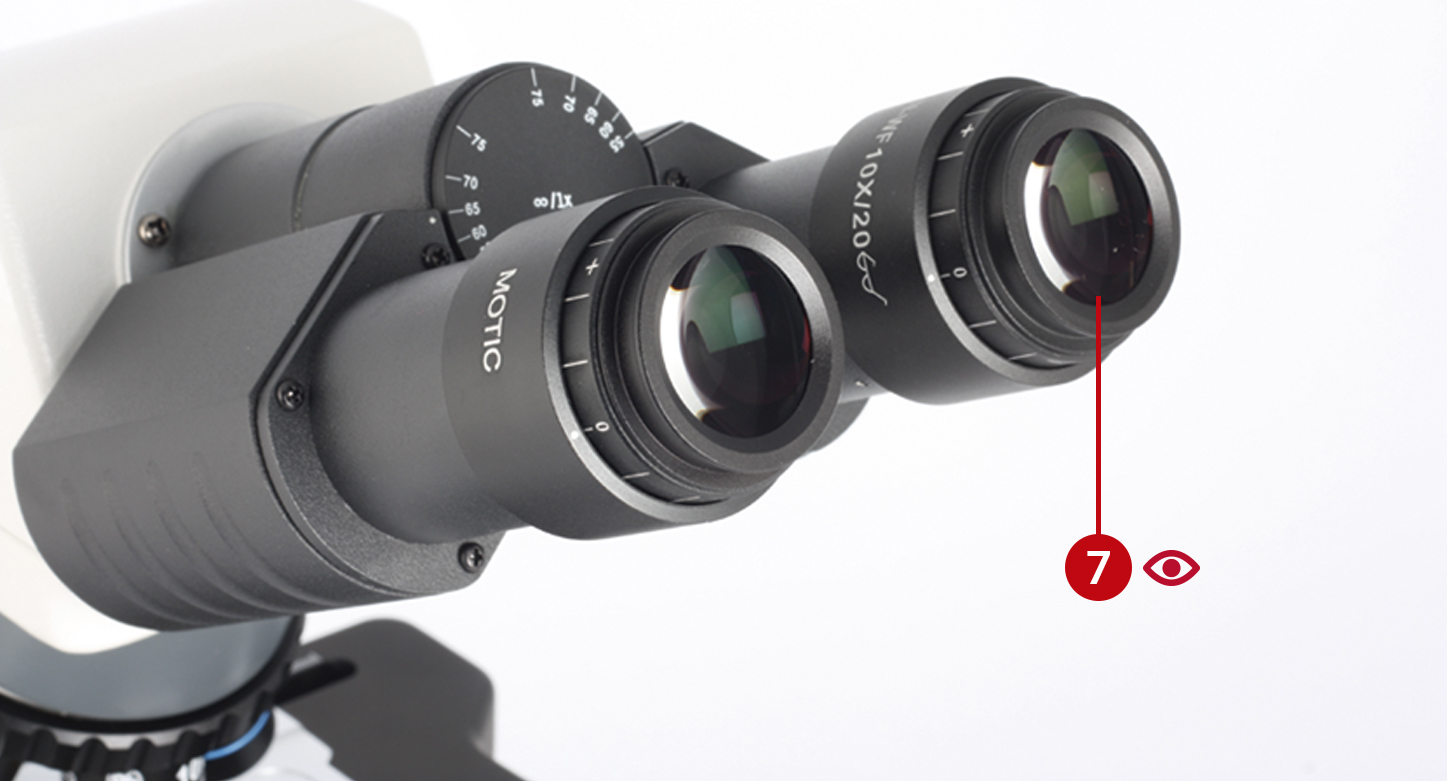
Focus the image by using the fine and/or coarse focusing adjustment knobs until the image of the specimen is sharp (8).

Then, look through the eyepiece on the left with your left eye. Use the diopter’s adjustment ring to focus the sample until the image of the specimen is sharp (9).
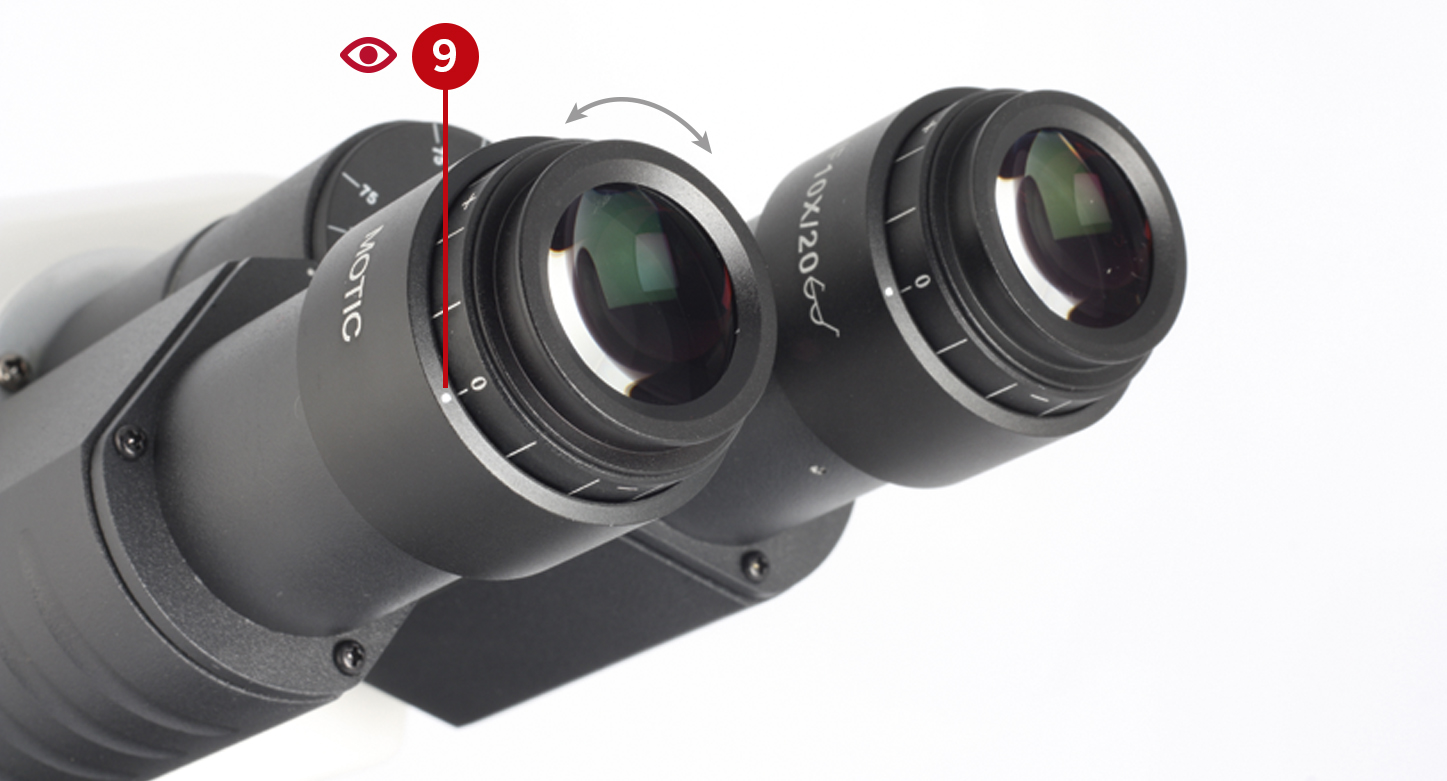
The microscope is now ready for perfect binocular viewing, according to the user’s dioptres, providing an accurate visualisation of the specimen.
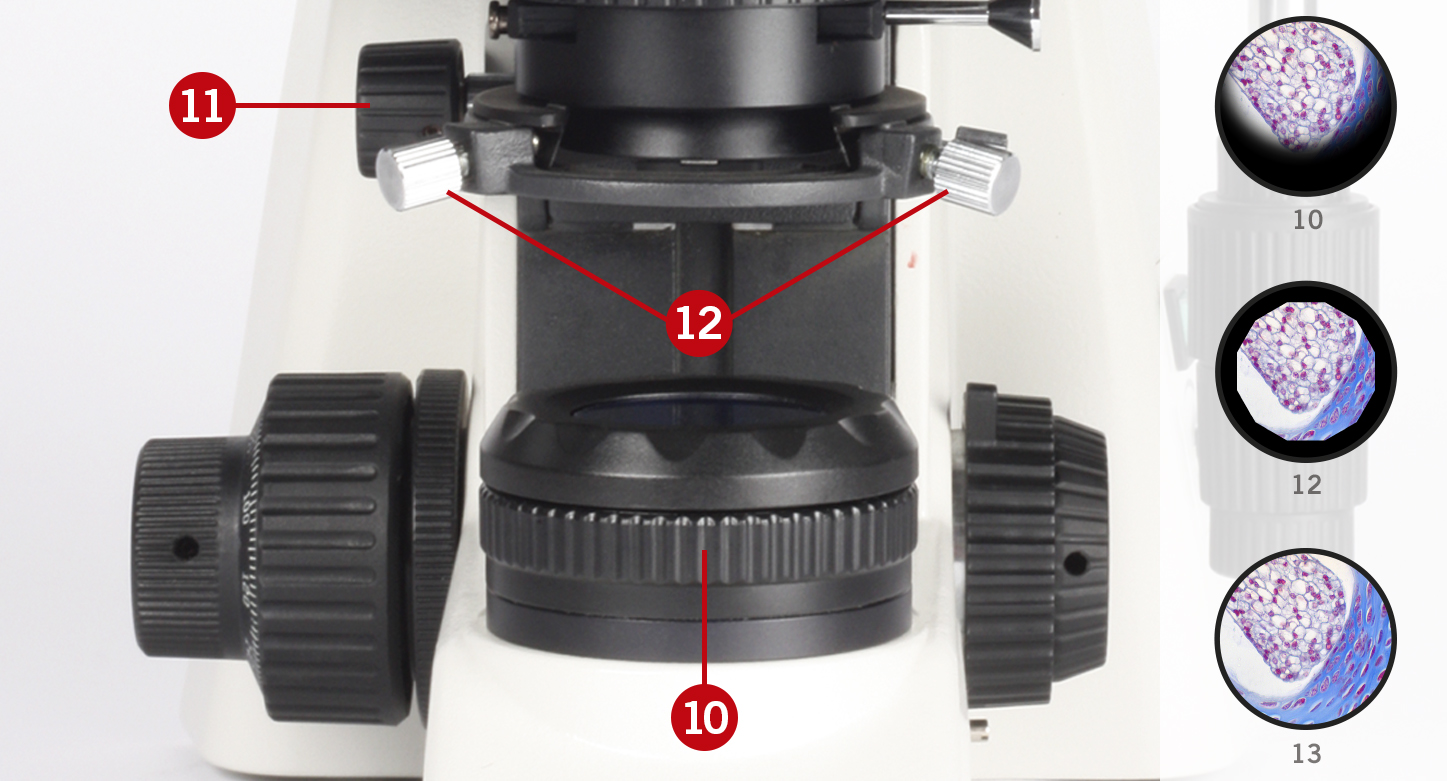
Condenser adjustment (for microscopes with Kohler illumination)
Note: Other models without Koehler illuminator are supplied pre-centred.
To ensure optimal and homogeneous Koehler illumination, we need to make sure that the specimen and the Koehler diaphragm are both in focus. For this procedure, we recommend using the 10X objective.
First, focus the sample. Then, close the aperture of the diaphragm of the Koehler illumination (10).
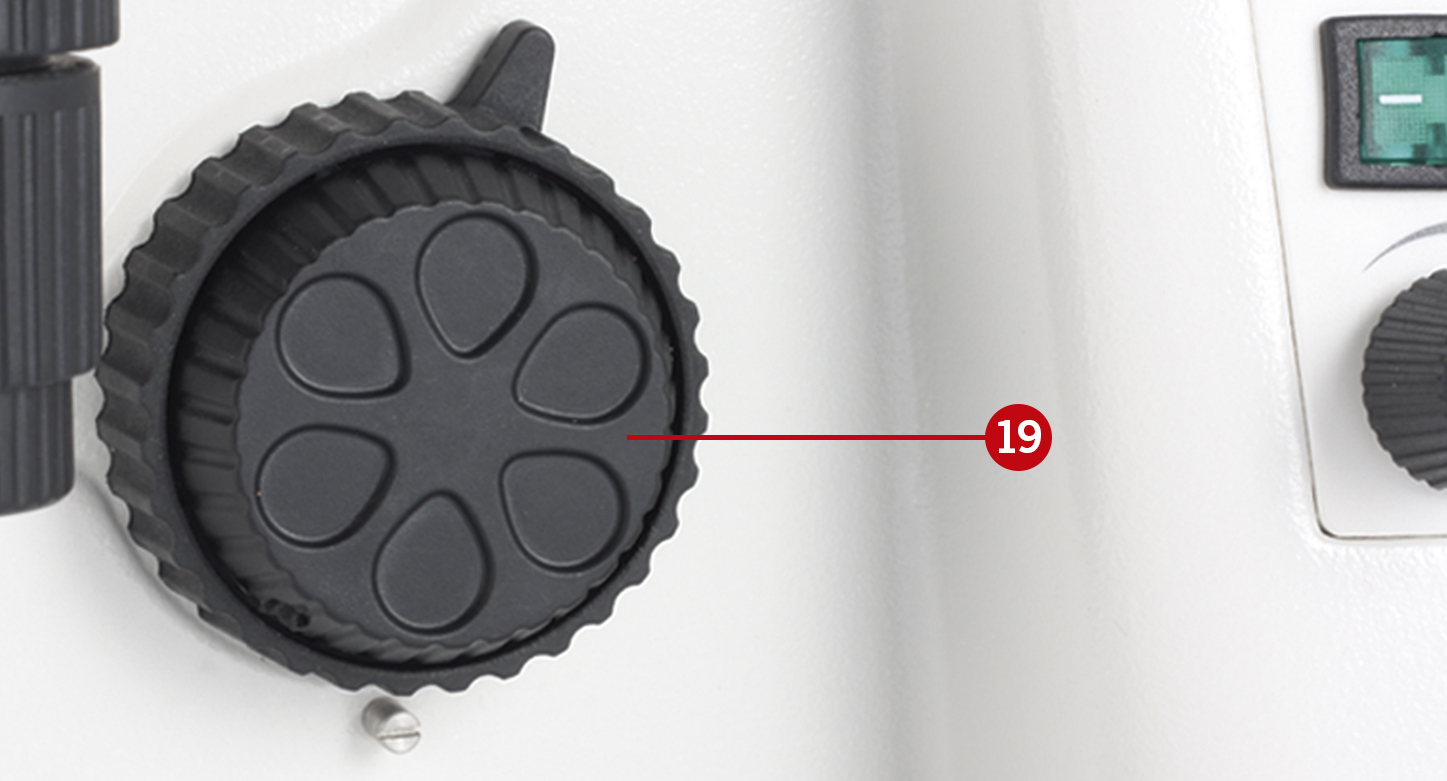
Now, focus the diaphragm moving the condenser up or down using the condenser’s focusing knob (located under the mechanical stage on the left hand-side of the microscope) (11).
Once the diaphragm is focused at the same level of the specimen, centre the condenser by using the condenser’s centring screws, located on both sides of the condenser (12).
After all of this is done, open the aperture of the diaphragm. Now the illumination should be homogeneous on the whole field of view (13).
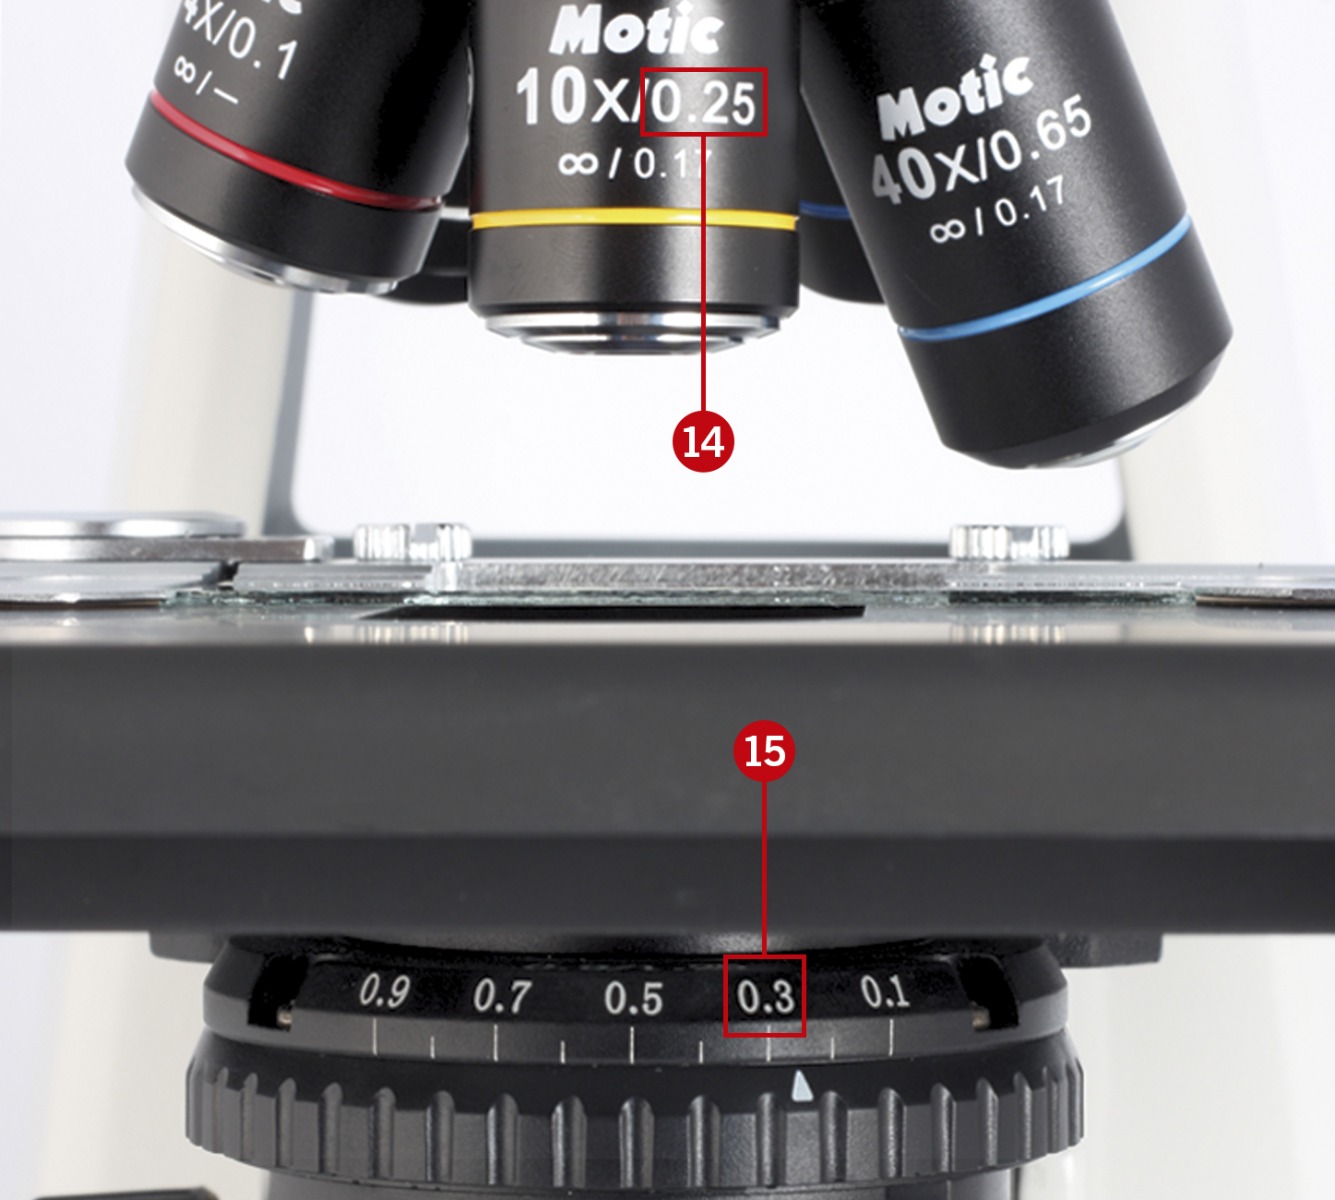
Condenser adjustment (of the iris diaphragm)
Note: When using the 100X objective, position the iris diaphragm aperture knob to the 0.9 value on the scale (or 100X engraved).
It is necessary to match the NA value of the objectives with the aperture of the iris diaphragm condenser.
Numerical Aperture is commonly used in microscopy to describe the angle of the cone of light that can enter or exit the objective lens; hence its light-gathering ability and resolution.
Align the aperture of the iris diaphragm ring matching it with the NA value on the scale (15). The scale value should match the NA number engraved on the objective (14), (some condensers show the position determined for each objective: 10X, 40X, etc...).
Using immersion oil objectives
Caution: Remove any air bubbles from the nozzle of the oil ampoule before use. Immersion oil must be used sparingly. After its use, the oil should be wiped off the 100X objective with a lens cleaning tissue, and the residual film should be removed with a solution made of ether (70%) and alcohol (30%).
Focus the sample with the 40X objective, locate your area of interest, and move the objective away from the light path (16).
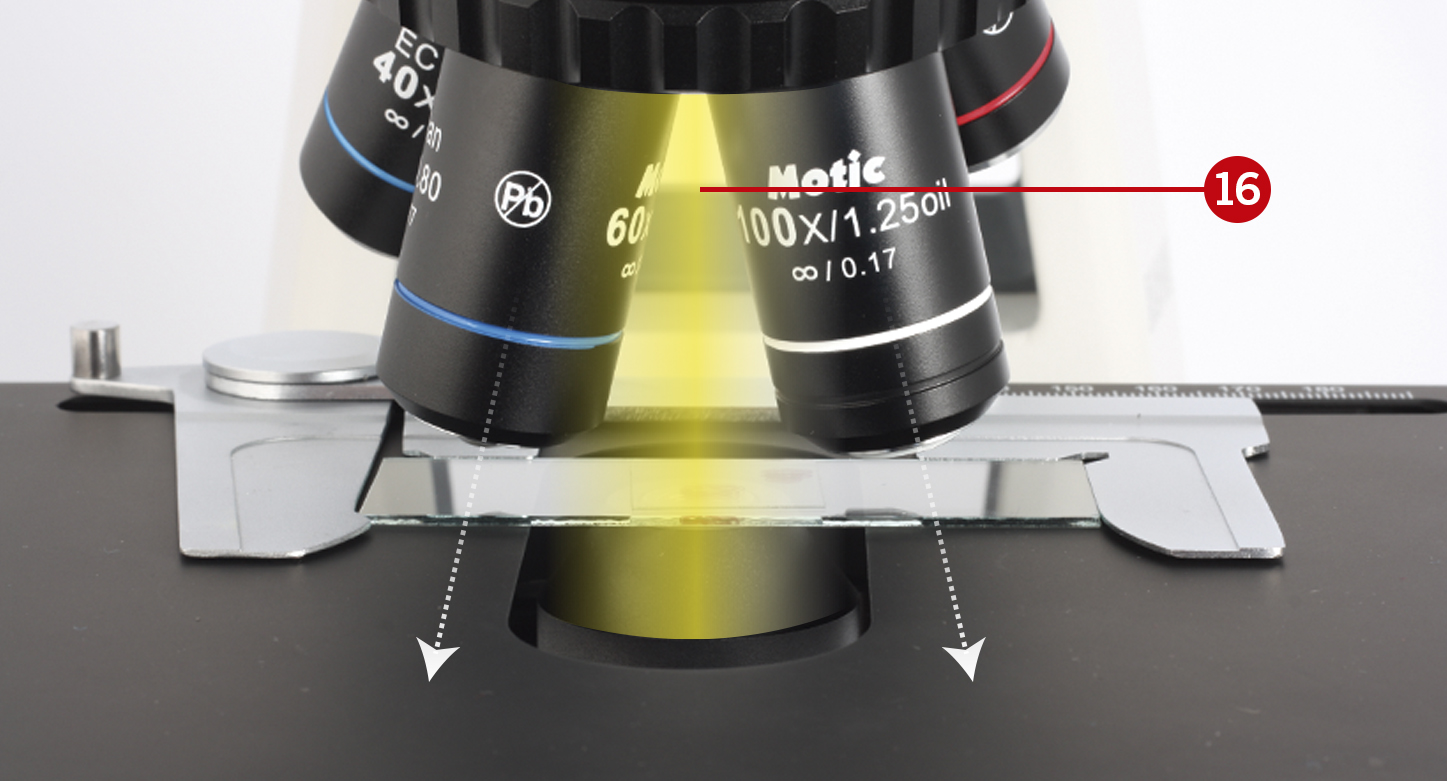
Add one drop of immersion oil on the sample and move the 100X objective on the light path (17).
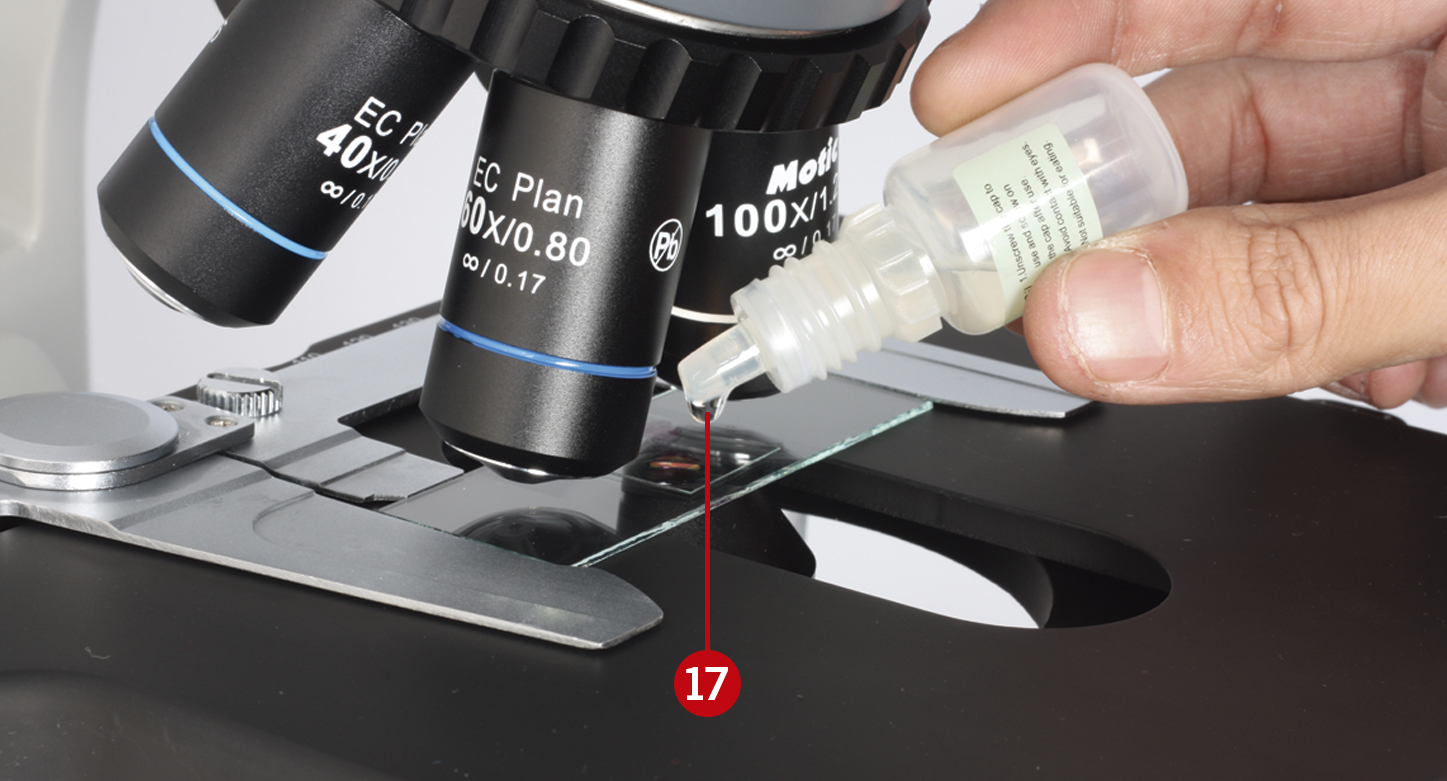
You will see that the oil will form a column-shaped drop between the sample and the objective’s lens (18).

Use the fine focusing knob to sharpen the image. Ensure no air bubbles have formed (19).
DOWNLOAD AS PDF:
ENGLISH
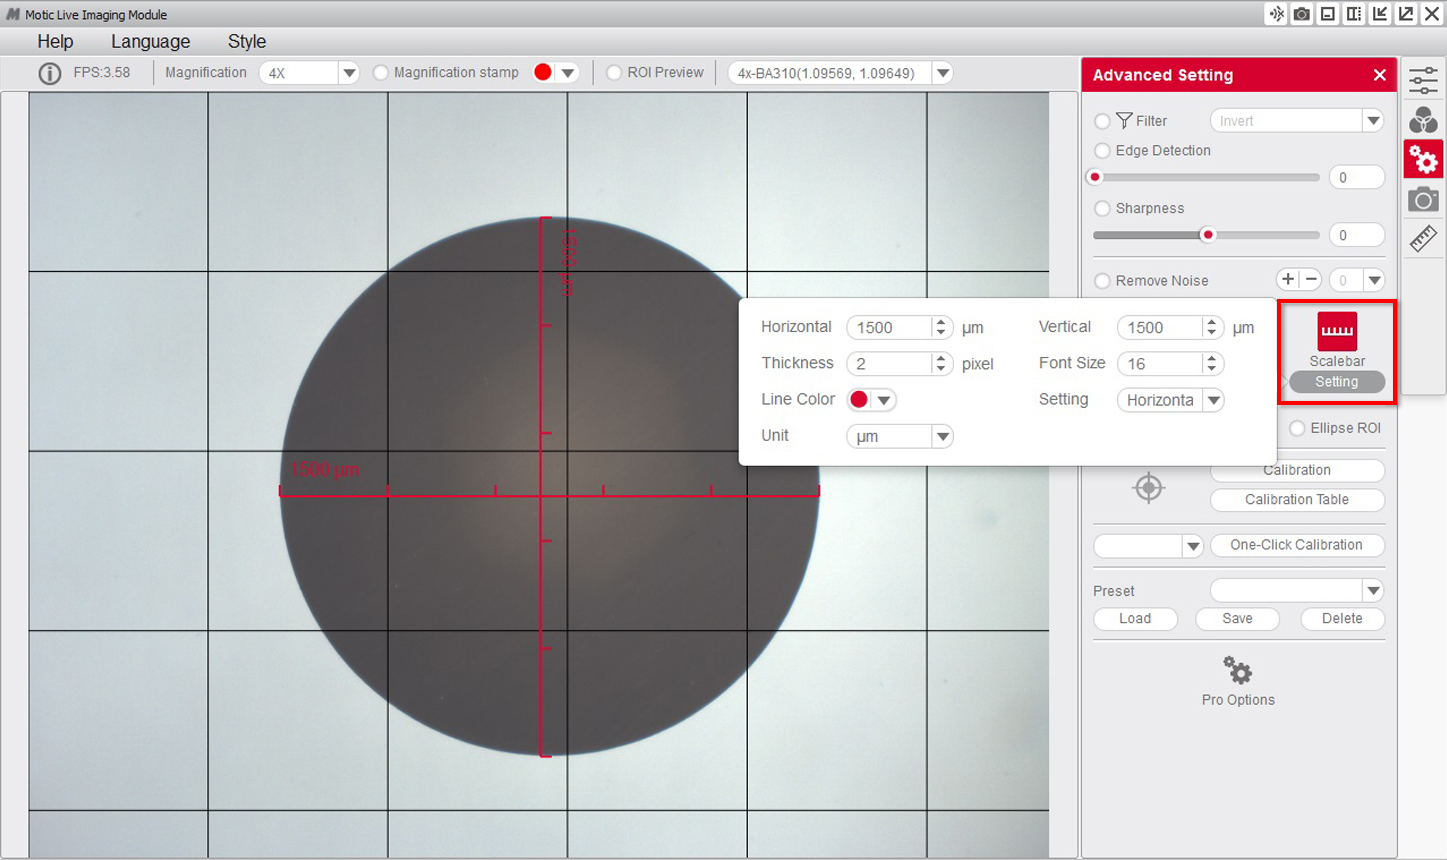
Calibration is only necesary if we wish to use the measurement, scale and grid functions of the software.
To calibrate the software with its Moticam or digital microscope, you will need to use the calibration slide supplied with said product.
We will select one of the four dots that appear on the calibration slide, using the appropriate dot based on the objective that we wish to calibrate.
Following the chart below, Motic recommends the following possible combinations of dot/objective to calibrate
| 4X Objective | Dot 1500 μm. |
| 10X Objective | Dot 600 μm. |
| 40X Objective | Dot 150 μm. |
| 100X Objective | Dot 70 μm. |

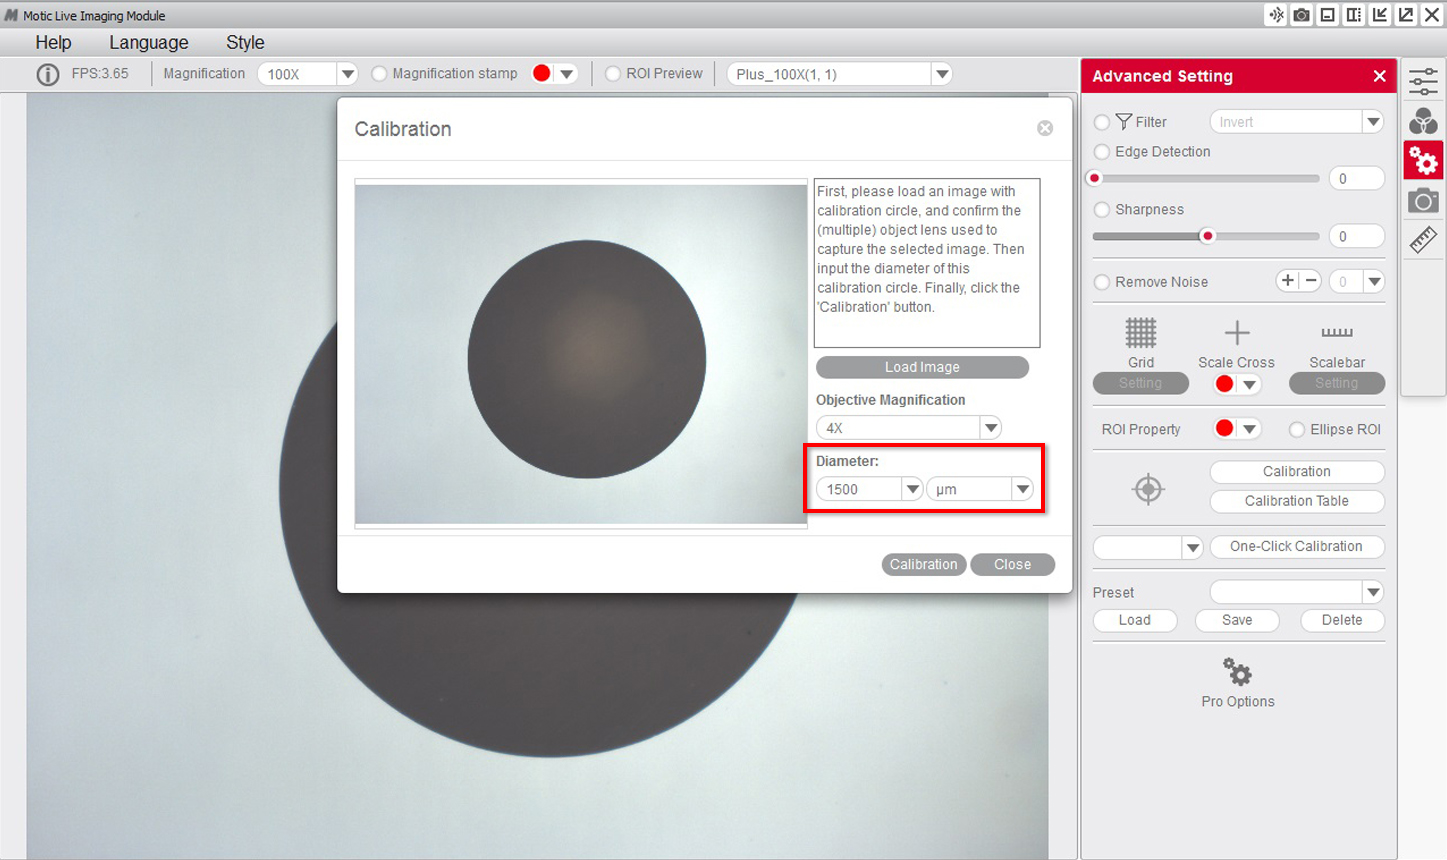
1- Once the dot is perfectly focused, and without it protruding from the field of view on the window, we will need to go to the "advanced settings" menu and select the option "calibration".
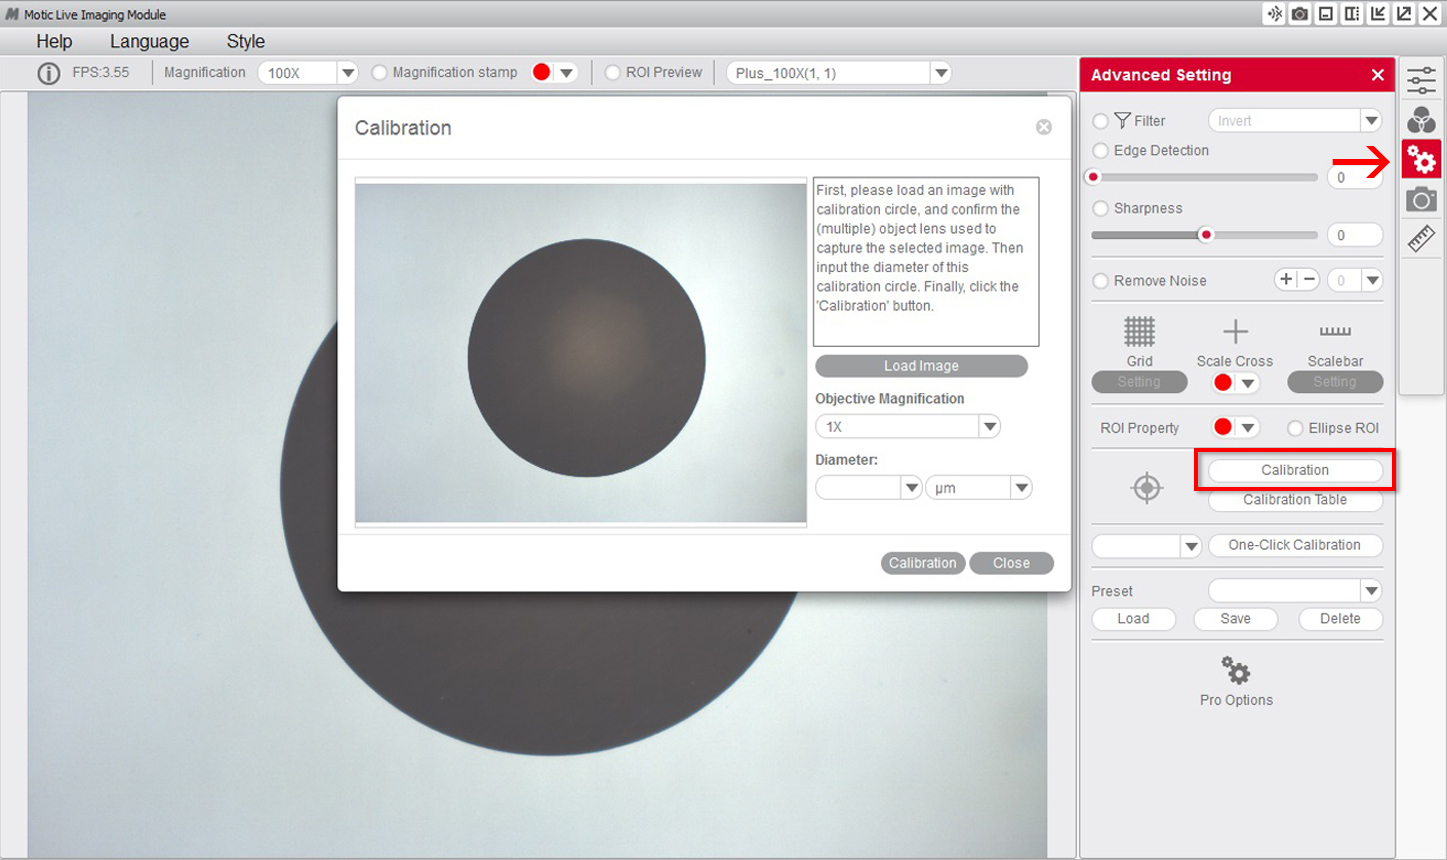
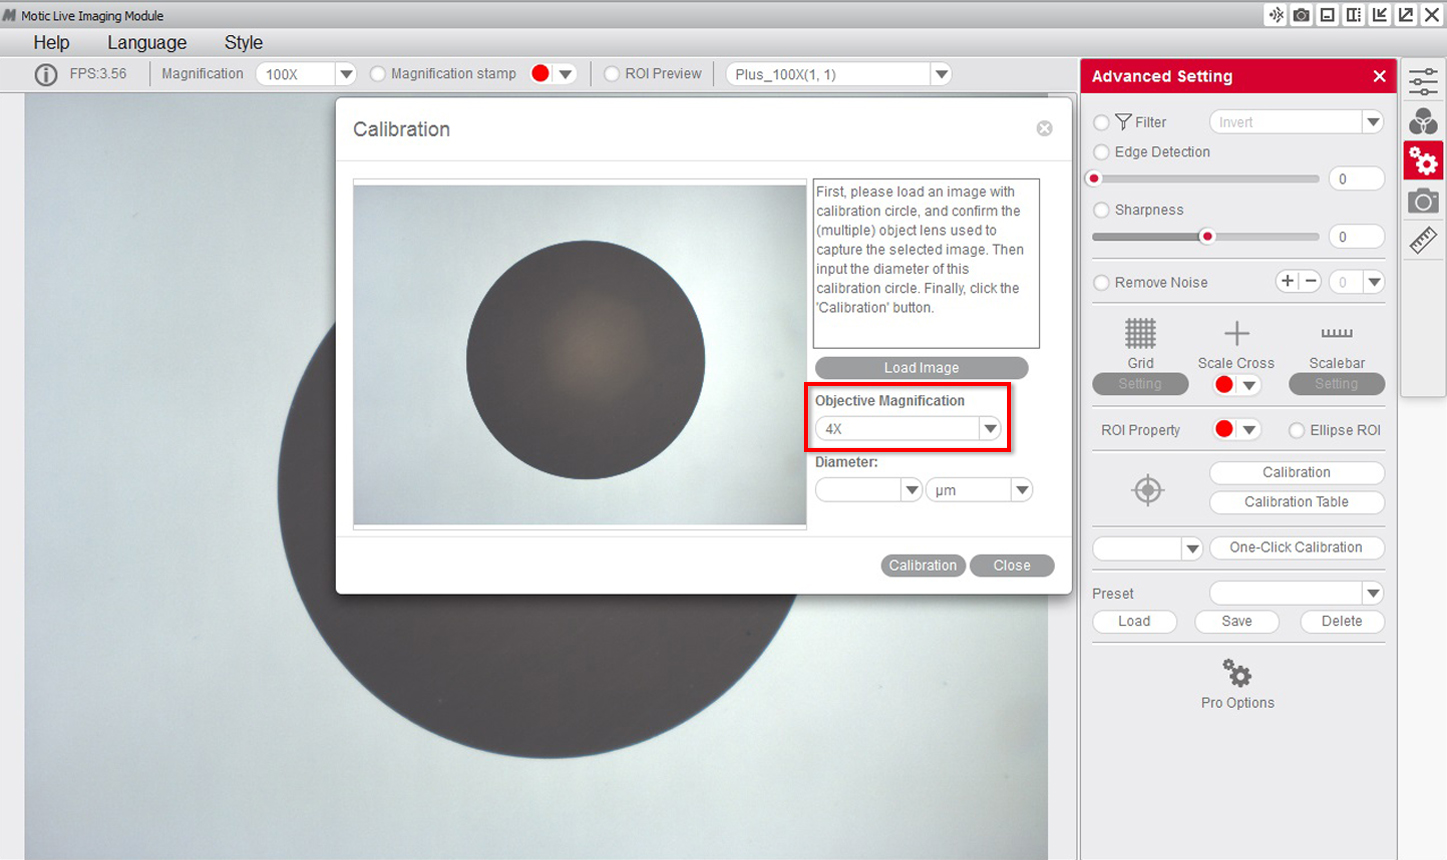
2- Select the "objective" that you are using to observe the dot on the calibration slide on the drop-down menu.
3- Select the "diameter" of the dot on the calibration slide on the drop-down menu.
4- After confirming the calibration, the selected area will automatically appear in green. In order to ensure the calibration has been completed successfully, the green area must match exactly with the area of the dot on the calibration slide.
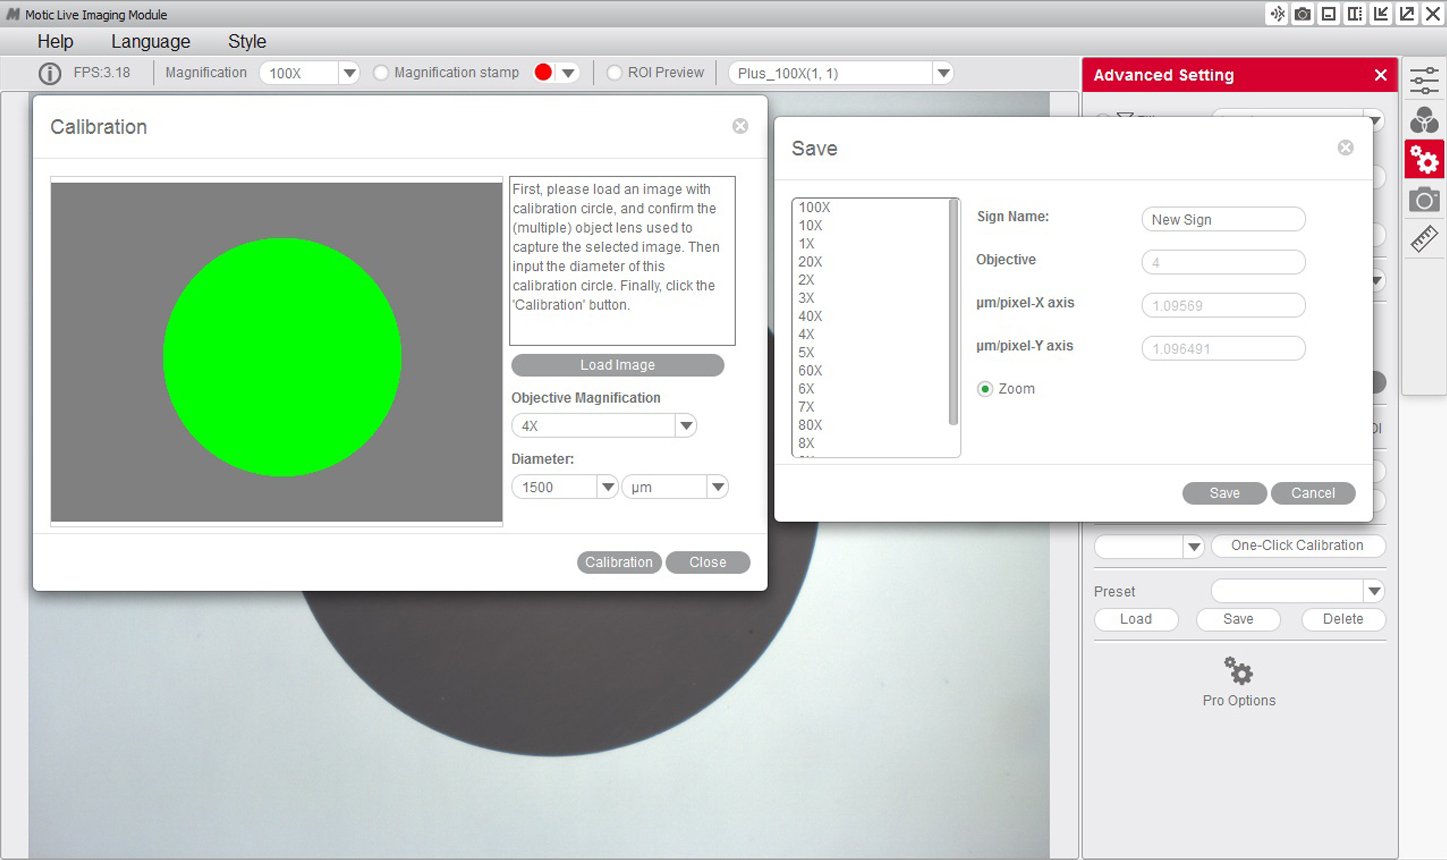
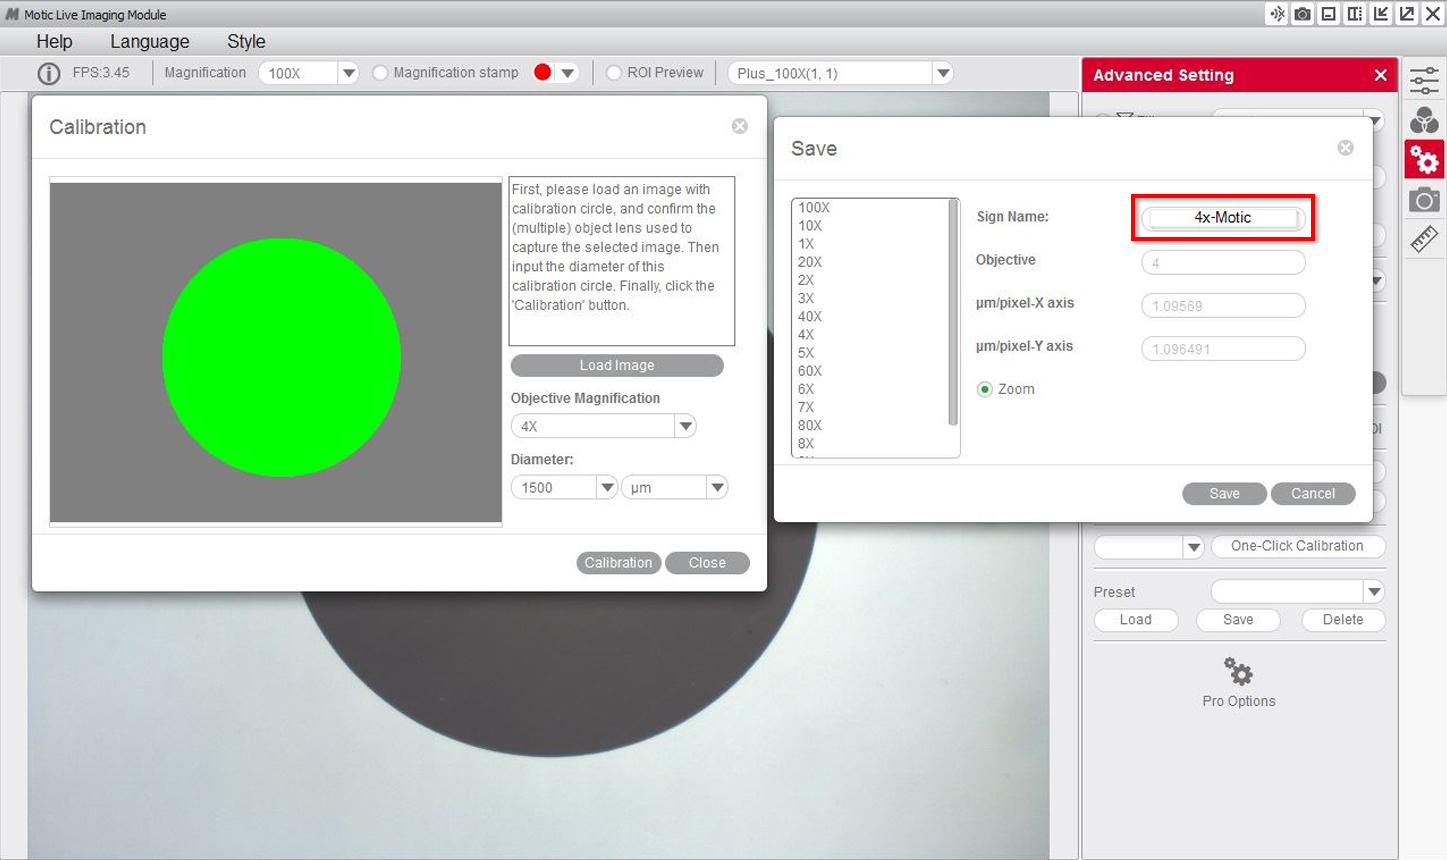
5- If we see that the program has not detected the dot correctly, we will have to repeat the calibration by making the necessary adjustments to ensure the results are correct. For example:
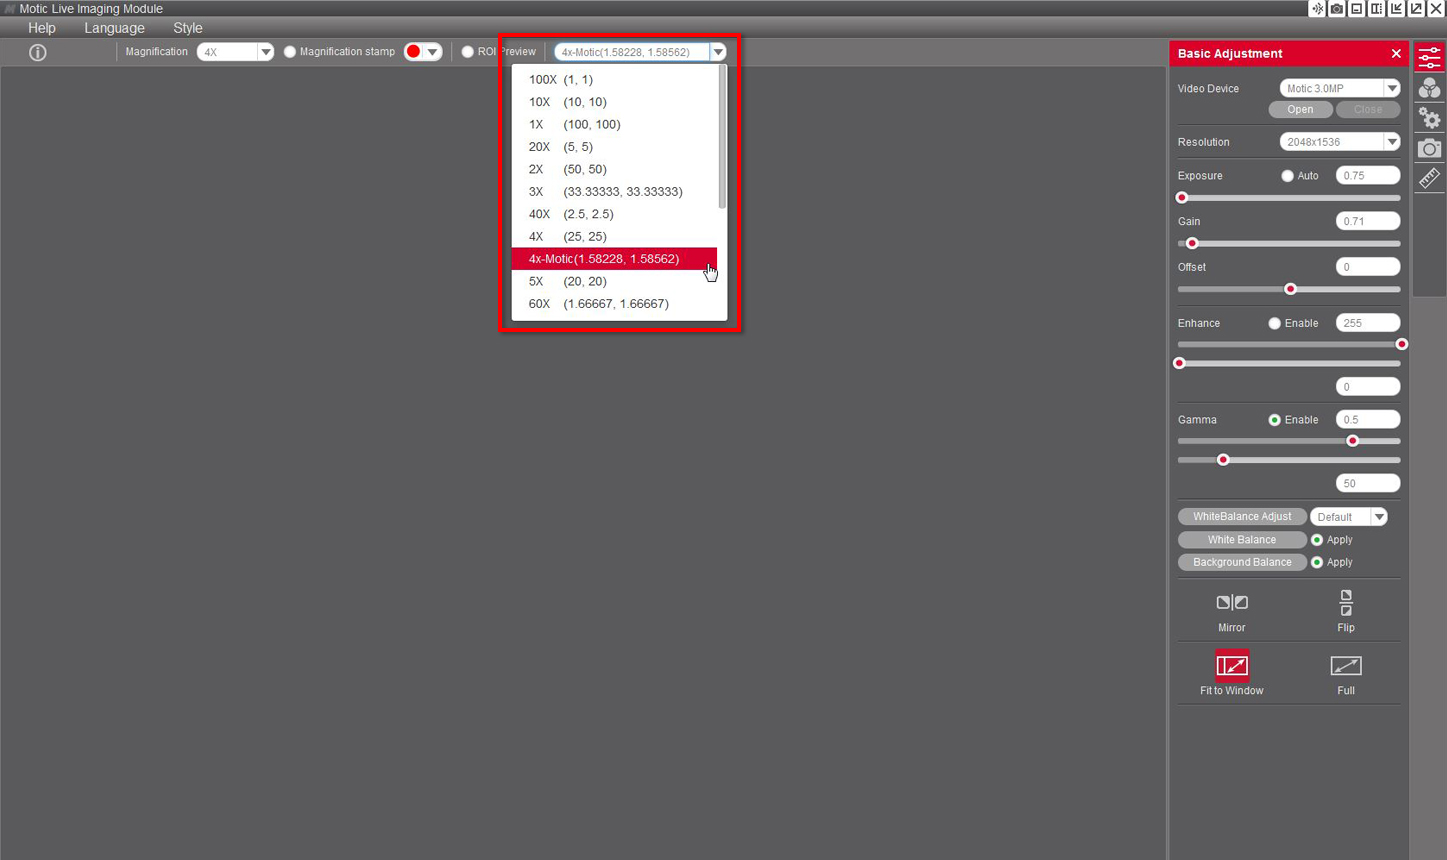
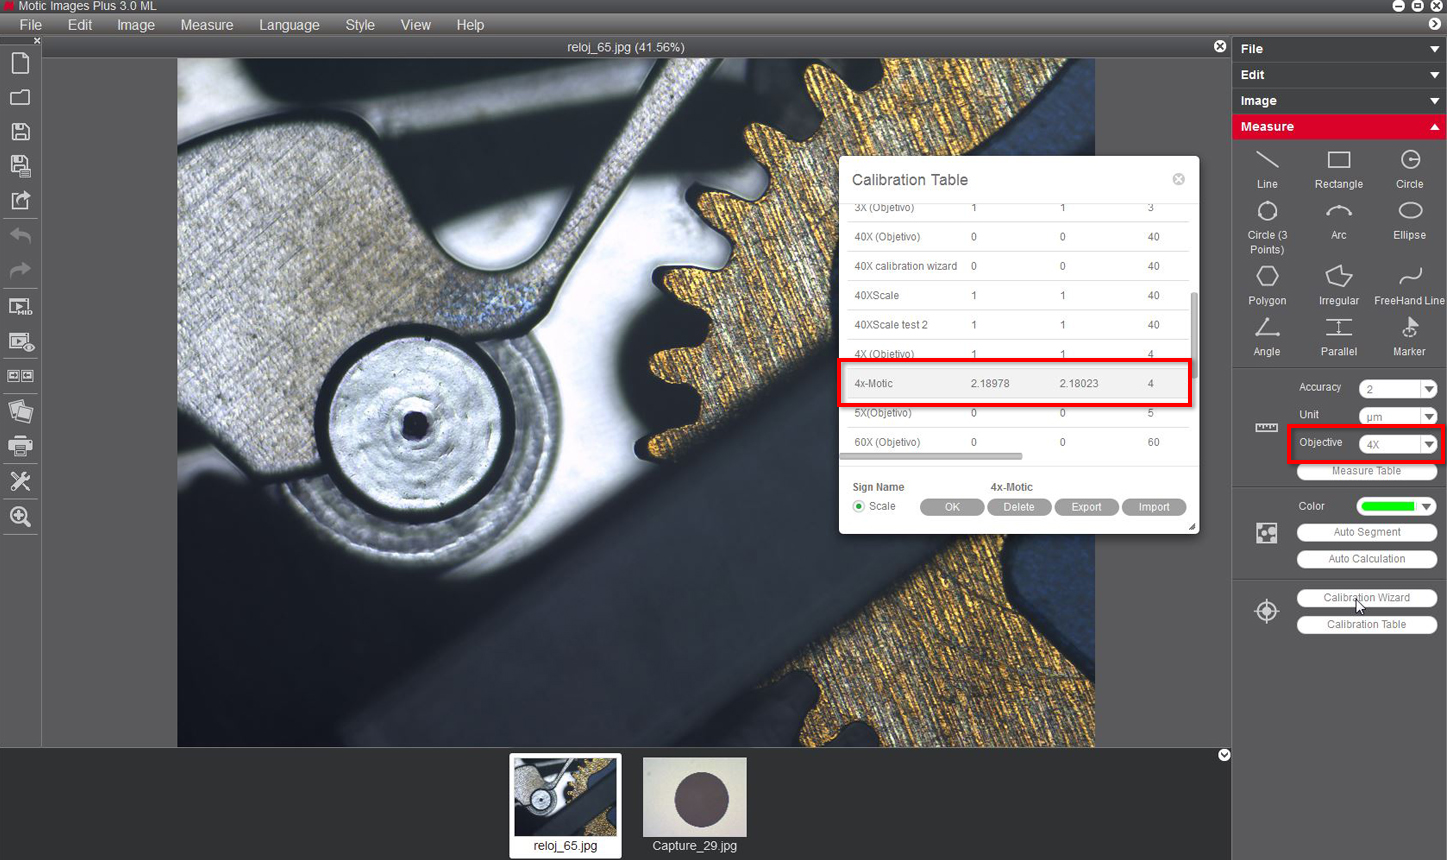
6- You will then be able to overwrite and rename the objective related to the calibration to your liking. This will help you identify it later on on the calibration table. For example: 4X-Motic and "Save" the calibration.
7- It is posible to overlap the grid and scale functions to ensure the calibration has been carried out properly.
8- Once the calibration is finalized, this new objective will appear in the drop-down menu of the Motic Live Imaging Module, allowing you to select it.
9- With the Motic Images Plus 3.0 software, once we have calibrated, it is also possible to take measurements after the image has been captured. Go to "measurements", drop-down menu "objective"
DOWNLOAD AS PDF:
ENGLISH | DEUTSCH | SPANISH | FRENCH | ITALIAN